MetKids Create
Calling all makers! Get inspired by hands-on projects that explore works of art and your own creativity using materials you can find at home. New activities launch biweekly, so come back often! And don’t forget to share your creations by using @metmuseum and #MetKidsCreate on social media or emailing your creation to familyprograms@metmuseum.org.
Speak Out!
Design a poster using recycled materials.
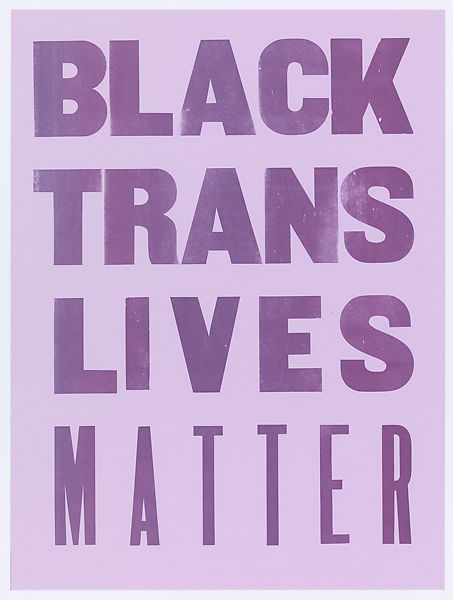
Black Trans Lives Matter, 2020. Center for Book Arts; designer and printer Elizabeth Castaldo. Letterpress, 24 × 18 in. (61 × 45.7 cm). The Metropolitan Museum of Art, New York, Gift of Center for Book Arts and Elizabeth Castaldo, 2021 (2021.143.1) © Elizabeth Cataldo
This poster calls for the protection of Black transgender people. The staff at the Center for Book Arts, an organization in New York City dedicated to books as artworks, printed and distributed this poster for protests in 2020.
What important statement would you want to share with the world?
Printmaking is a quick way to make many copies of a design, such as a poster.
1. Think of a bold statement.
2. Trace the outline of a foam tray onto copy paper, then write your statement in bold block letters within the outline.
3. On a second sheet of paper, rewrite all the letters (and/or numbers) backwards. (They will magically look correct when printed.)
4. Place the mirror-image statement on top of the foam tray and trace the letters with firm pressure using a dull pencil or chopstick.
5. Lightly paint the foam-tray drawing.
6. Place the foam tray paint side down onto a clean sheet of paper.
7. Roll with a rolling pin.
8. Peel off the paper and let dry.
9. Repeat to make as many posters as you want.
10. Display your statement to share with the world!
Materials
- Styrofoam tray
- Paper
- Pencil
- Scissors
- Paint brush
- Dull pencil or chop stick
- Tempera paint
- Rolling pin
- Damp rag
Learn more about printmaking with #MetKids!
Share what you make on social media @metmuseum and #MetKidsCreate or email your creation to familyprograms@metmuseum.org.
Sensational Shoes
Use your imagination to design your own pair of shoes.
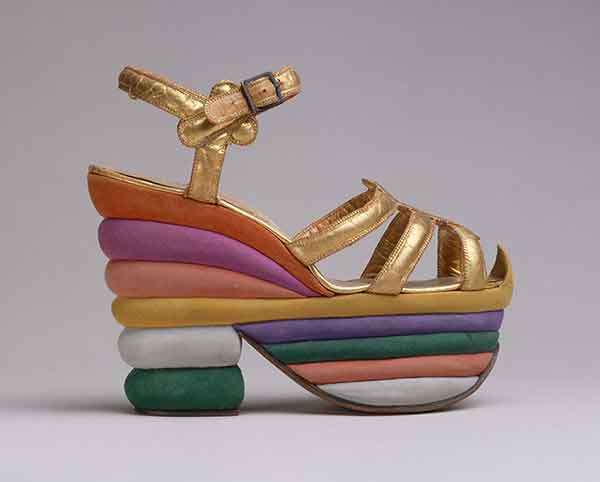
Sandals. Designer House, Salvatore Ferragamo (Italian, founded 1929). Designed by Salvatore Ferragamo (Italian, 1898–1960). Leather, cork. The Metropolitan Museum of Art, New York, Gift of Salvatore Ferragamo, 1973 (1973.282.2)
What colors do you see? How does this shoe make you feel? The heel is over five inches high. The designer went to school to study anatomy. Why might it be important for a shoe designer to study the structure of the body?
Italian fashion designer Salvatore Ferragamo created this colorful sandal (and its mate) more than 80 years ago for the singer and actor Judy Garland, a year before she sang "Somewhere Over the Rainbow" as Dorothy in the movie, The Wizard of Oz. He was inspired to experiment with new and different materials, and made these not only from leather, but also cork. He was only 9 years old when he made his first pair of shoes—for his sister to wear at her first communion ceremony in church. What kinds of shoes do you like to wear?
Design your own shoes!
1. Trace the side of your shoe on a piece of paper.
2. Add details in pencil.
3. Use markers, colored pencils, or crayons to complete your creation.
Materials
- Favorite pair of shoes
- Drawing paper
- Pencils
- Optional: colored pencils, markers, crayons
Learn more about this fabulous shoe with #MetKids!
Share what you make on social media @metmuseum and #MetKidsCreate or email your creation to familyprograms@metmuseum.org.
Creative Collar
Design a decorative collar.
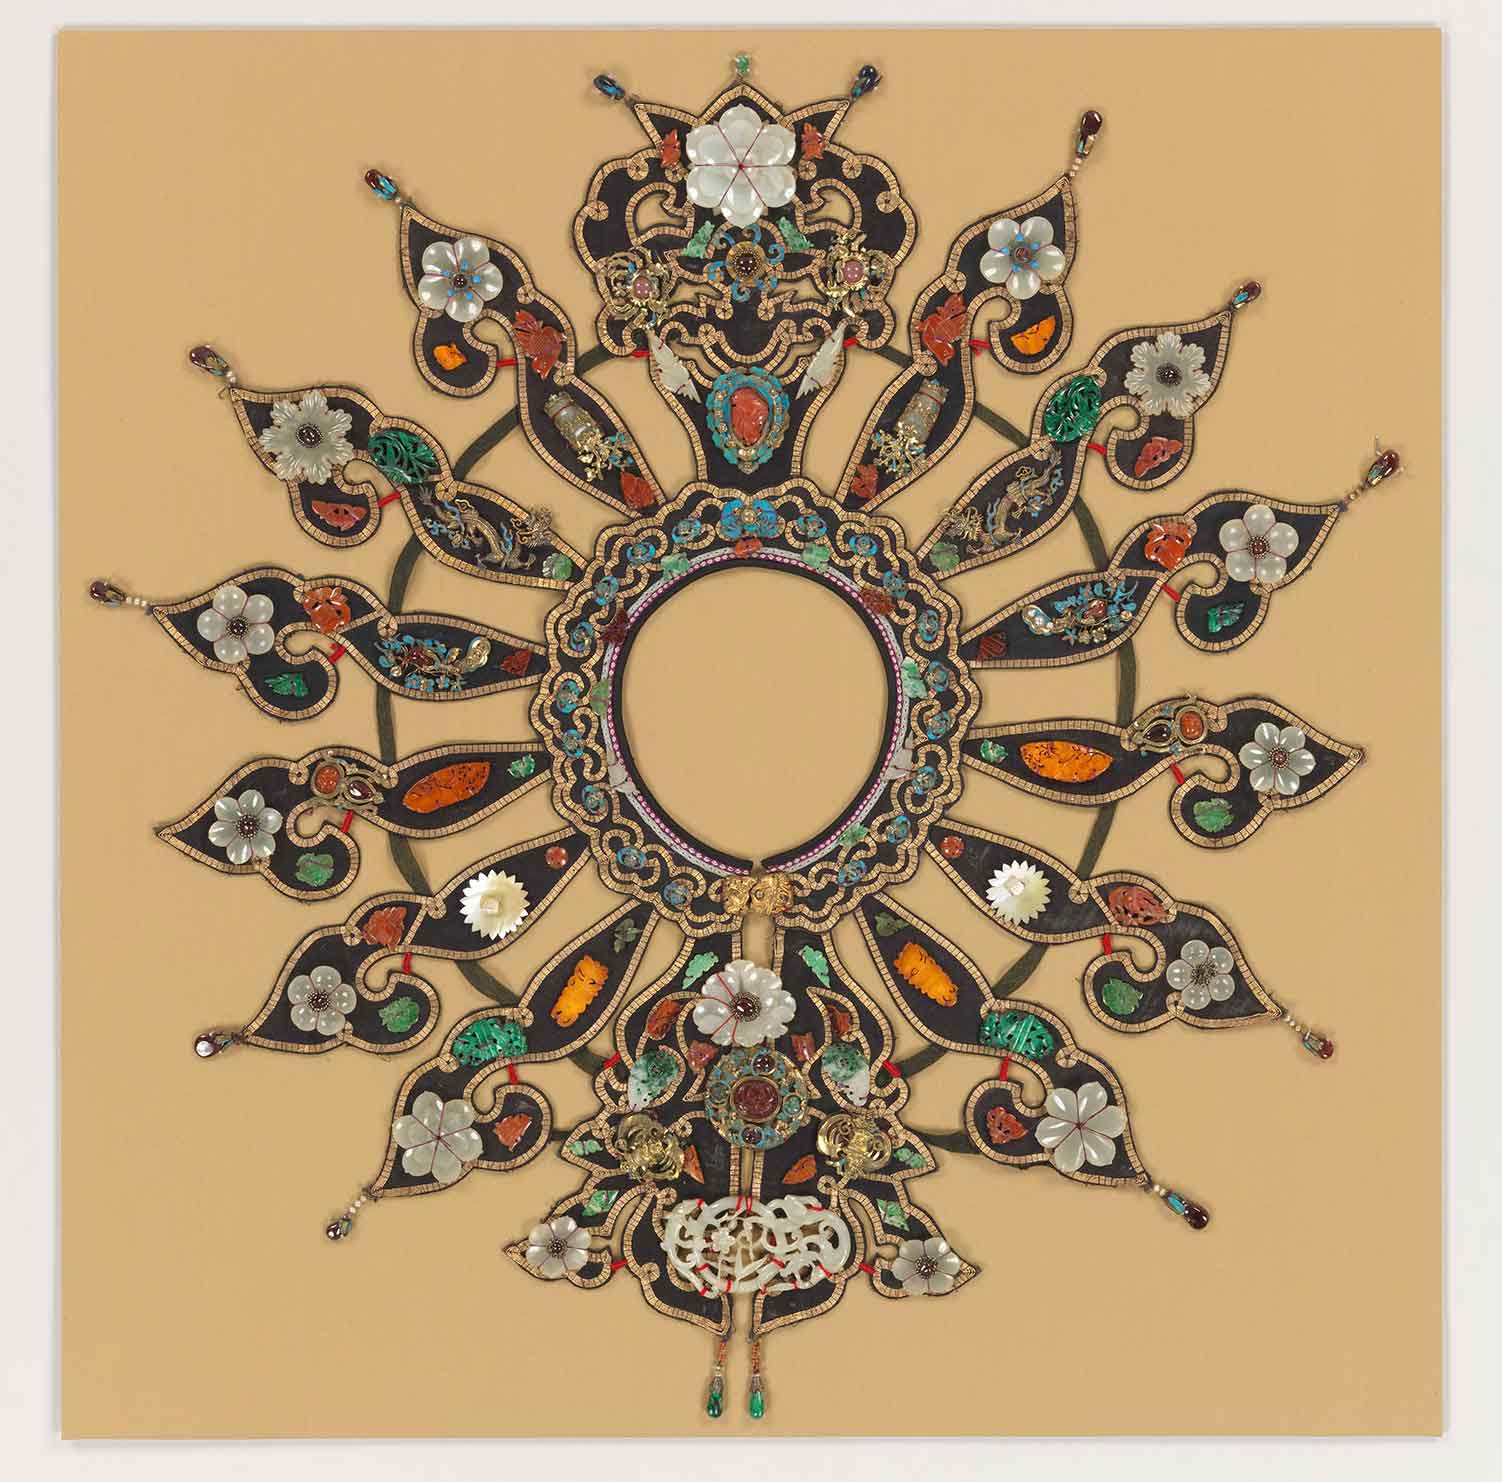
Theatrical Collar. China, 18th century. Qing dynasty (1644–1911). Silk, metallic thread, jade, gilt metal, kingfisher feathers, amber, mother-of-pearl, malachite, faux pearls, glass, various stones, overall: 23 ½ x 21in. (59.7 x 53.3cm) Mount: 26 x 25 ½ in. (66 x 64.8 cm). Fletcher Fund, 1935 (35.140.10)
This fancy Chinese collar is made with a lot of different materials, including jade (a light-to-dark green stone), gold-colored gilt metal, kingfisher bird feathers, warm-colored amber, shiny mother-of-pearl, green malachite, beads that looks like pearls, glass, and other stones. Many of the small jade ornaments have been reused here—they probably decorated women’s headdresses hundreds of years before the collar was made. Imagine who might have worn this collar. Where would someone wear something like this?
An actor may have worn this collar in the role of a woman as part of a theater performance. Pretend you are wearing this collar. How heavy would it feel hanging around your neck and draped over your shoulders?
Design a special collar to wear at home!
1. Create the base for your design by cutting large pieces in similar shapes out of fabric or paper.
2. Connect the shapes to each other in the form of a circle using ribbon, string, or pieces of paper. Remember that the middle of the circle needs to fit around your neck.
3. Add beads or cut different smaller shapes out of paper and attach to the larger shapes. Play with different colors and shapes to create an interesting design.
4. Continue to layer beads or paper on your collar or use markers to create designs for an eye-catching pattern!
Materials
- Different color paper or fabric
- Ribbons or string
- Beads
- Markers
- Scissors
- Glue
Share what you make on social media @metmuseum and #MetKidsCreate or email your creation to familyprograms@metmuseum.org.
Celebrate Asian American and Pacific Islander Heritage Month
Create a sculpture inspired by rocks and water.
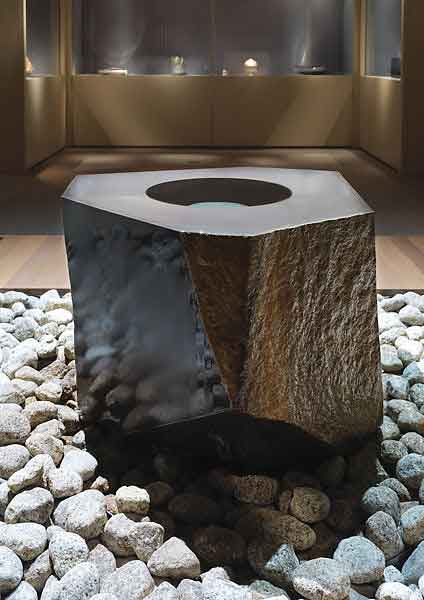
Isamu Noguchi (American, 1904–1988). Water Stone, 1986. Basalt; on a foundation bed of naturally rounded granite stones, H. 25 in. (63.6 cm); W. 42 3/4 in. (108.6 cm); Wt. 1 ton. The Metropolitan Museum of Art, New York, Purchase, Anonymous Gift, 1987 (1987.222) © The Isamu Noguchi Foundation and Garden Museum
The artist Isamu Noguchi carved some parts of this big rock to appear very smooth and left others rougher, as the rock might look in nature. Water flows so gently from the center of this fountain it is almost invisible. You can hear it though—if you visit the galleries, listen closely to the sound of the water as you look at the sculpture from different angles.
All of the stones you see here come from Japan. The big rock at the center weighs one ton—that’s as heavy as a car! It is perfectly level in relation to the center of the earth. How do you think the artist transported this rock from Japan to New York City?
Make a sculpture with, and inspired by, materials in nature
1. Take a walk in nature.2. Collect rocks and stones to create a sculpture at home.
3. Arrange the rocks with other found objects to create a sculpture; use materials that represent both inside and outside.
4. Slowly pour water on different parts of your sculpture.
5. What message does your sculpture share with viewers?
Materials
- Rocks or stones
- Water in a bowl or jar
- Found objects
Share what you make on social media @metmuseum and #MetKidsCreate or email your creation to familyprograms@metmuseum.org.
Quirky Quilts
Design your own comforting quilt.
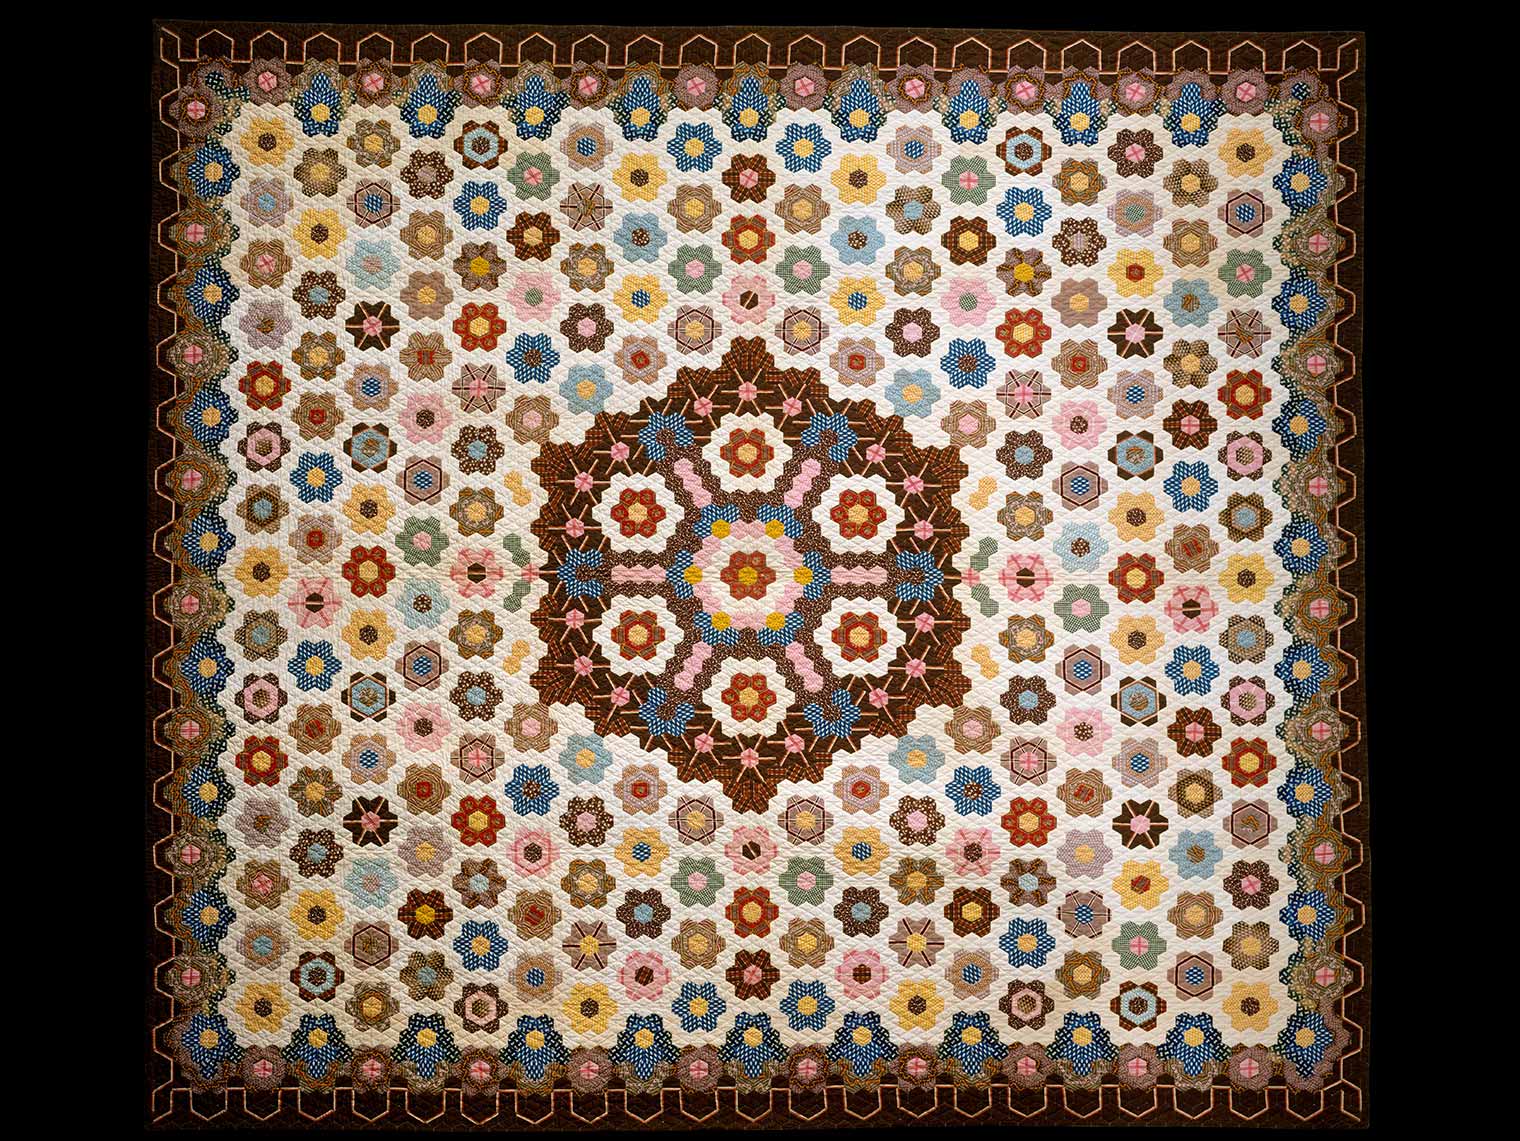
Elizabeth Van Horne Clarkson (American, 1771–1852). Honeycomb Quilt, ca. 1830. Cotton, 107 5/8 x 98 ¼ in. (273.4 x 249.6 cm). The Metropolitan Museum of Art, New York, Gift of Mr. and Mrs. William A. Moore, 1923 (23.80.75)
Elizabeth Van Horne Clarkson made this quilt from hundreds of small hexagonal (six-sided) pieces of fabric. Take a moment to observe the patterns and colors on the quilt. What details do you notice?
Elizabeth Clarkson may have made the quilt as a wedding present for her son Thomas. Do you have something that someone special gifted to you and brings you comfort?
Use geometric shapes to design your own patterned quilt.
1. For this activity, gather any scrap fabric that you can find in your home. Use one larger rectangular piece of fabric as the background for your quilt.
2. Just as Elizabeth Clarkson used hexagons to design her quilt, cut your fabric scraps into geometric shapes to decorate yours.
3. Clarkson made a honeycomb pattern with her hexagons. What images can you make just using geometric shapes?
4. Glue your images to the larger piece of fabric.
5. Gift your finished quilt to a family member or friend.
Materials
• Scrap fabric
• Scissors
• Glue
Learn more about this kind of artwork with #MetKids!
Share what you make on social media @metmuseum and #MetKidsCreate or email your creation to familyprograms@metmuseum.org.
Supportive Seating
Collage a chair inspired by someone special in your life.

Royal Seat (Lupona): Female Caryatid. Luba or Hemba peoples, 19th century. Wood, metal studs, H. 24 x W. 11 x D. 11 in. (61 x 27.9 cm). Purchase, Buckeye Trust and Charles B. Benenson Gifts, Rogers Fund and funds from various donors, 1979 (1979.290)
This was the seat of a leader of the Luba peoples in the Democratic Republic of the Congo in Africa. It was carved out of a single piece of soft wood, then covered with layers of oil to create a beautiful shine. Seats of leaders are important symbols of power. Luba kings did not actually sit on this seat. Instead it was meant to hold the king’s spirit. Because Luba royalty was handed down through the female line, these kinds of seats are often held up by figures of women that represent ancestors. Look closely at the detailed patterns carved into the woman’s stomach and hair.
In Luba society, the type of seats people sat in—from simple woven mats to wooden thrones like this—changed with their rank. How have your chairs changed as you’ve grown up?
Honor an important person in your life!
1. Who are the people who support you in your life?
2. Cut out a photo of one of them.
3. Paste the photo in the center of a piece of paper.
4. Cut out pictures of parts of furniture to collage with the photo of your important person so it looks like they are seated on a chair.
5. Display your design to remind yourself of how this person has helped care for you.
Materials
- Paper
- Photo of someone important in your life
- Furniture catalogs and advertisements
- Scissors
- Glue
Learn more about this stool with #MetKids!
Share what you make on social media @metmuseum and #MetKidsCreate or email your creation to familyprograms@metmuseum.org.
Dazzling Dragon
Celebrate the Lunar New Year with a dragon that brings good luck. Dragons are believed to possess great power and wisdom.

Jar with Dragon. China, early 15th century. Ming dynasty (1368–1644), Xuande mark and period (1426–35). Porcelain painted with cobalt blue under transparent glaze (Jingdezhen ware). H. 19 in. (48.3 cm); Diam. 19 in. (48.3 cm). Gift of Robert E. Tod, 1937 (37.19.11)
Take a look at this large jar decorated with a dragon. Dragons are imaginary creatures with features of real animals. Describe what you see. What do you notice about this jar? Look closer. What details can you find?
What words would you use to describe this dragon’s personality? List some words that come to mind. Do any of these words describe you? Dragons are believed to possess power and wisdom in certain cultures. What animals are important in your community or culture?
Design a fierce dragon out of an egg carton!
1. Use scissors to cut the egg carton in half lengthwise to separate the top from the bottom. Cut either the top or the bottom of the carton in half lengthwise. Use tape to connect the two pieces, making one long row of twelve cups.
2. Add color, patterns, or shapes, drawing inspiration from The Met collection.
3. Add more details. Does your dragon have scales? What size, shape, and color are they? Think about what goes on the dragon’s underbelly.
4. Optional: Use glue to add beads, paper, or tissue paper. You can also use other materials like yarn, straws, or pipe cleaners to add more details to your dragon.
5. Share your ferocious dragon with friends and family!
Materials
• Egg carton
• Scissors
• Tape
• Markers or paint
• Decorative accessories: beads, paper, yarn, straws, or pipe cleaners (optional), and glue to attach them
Learn more about Asian Art with #MetKids!
Share what you make on social media @metmuseum and #MetKidsCreate or email your creation to familyprograms@metmuseum.org.
Stirring Sounds
Heat up a warm drink and listen closely to the stirring sounds inspired by a Mexican instrument.
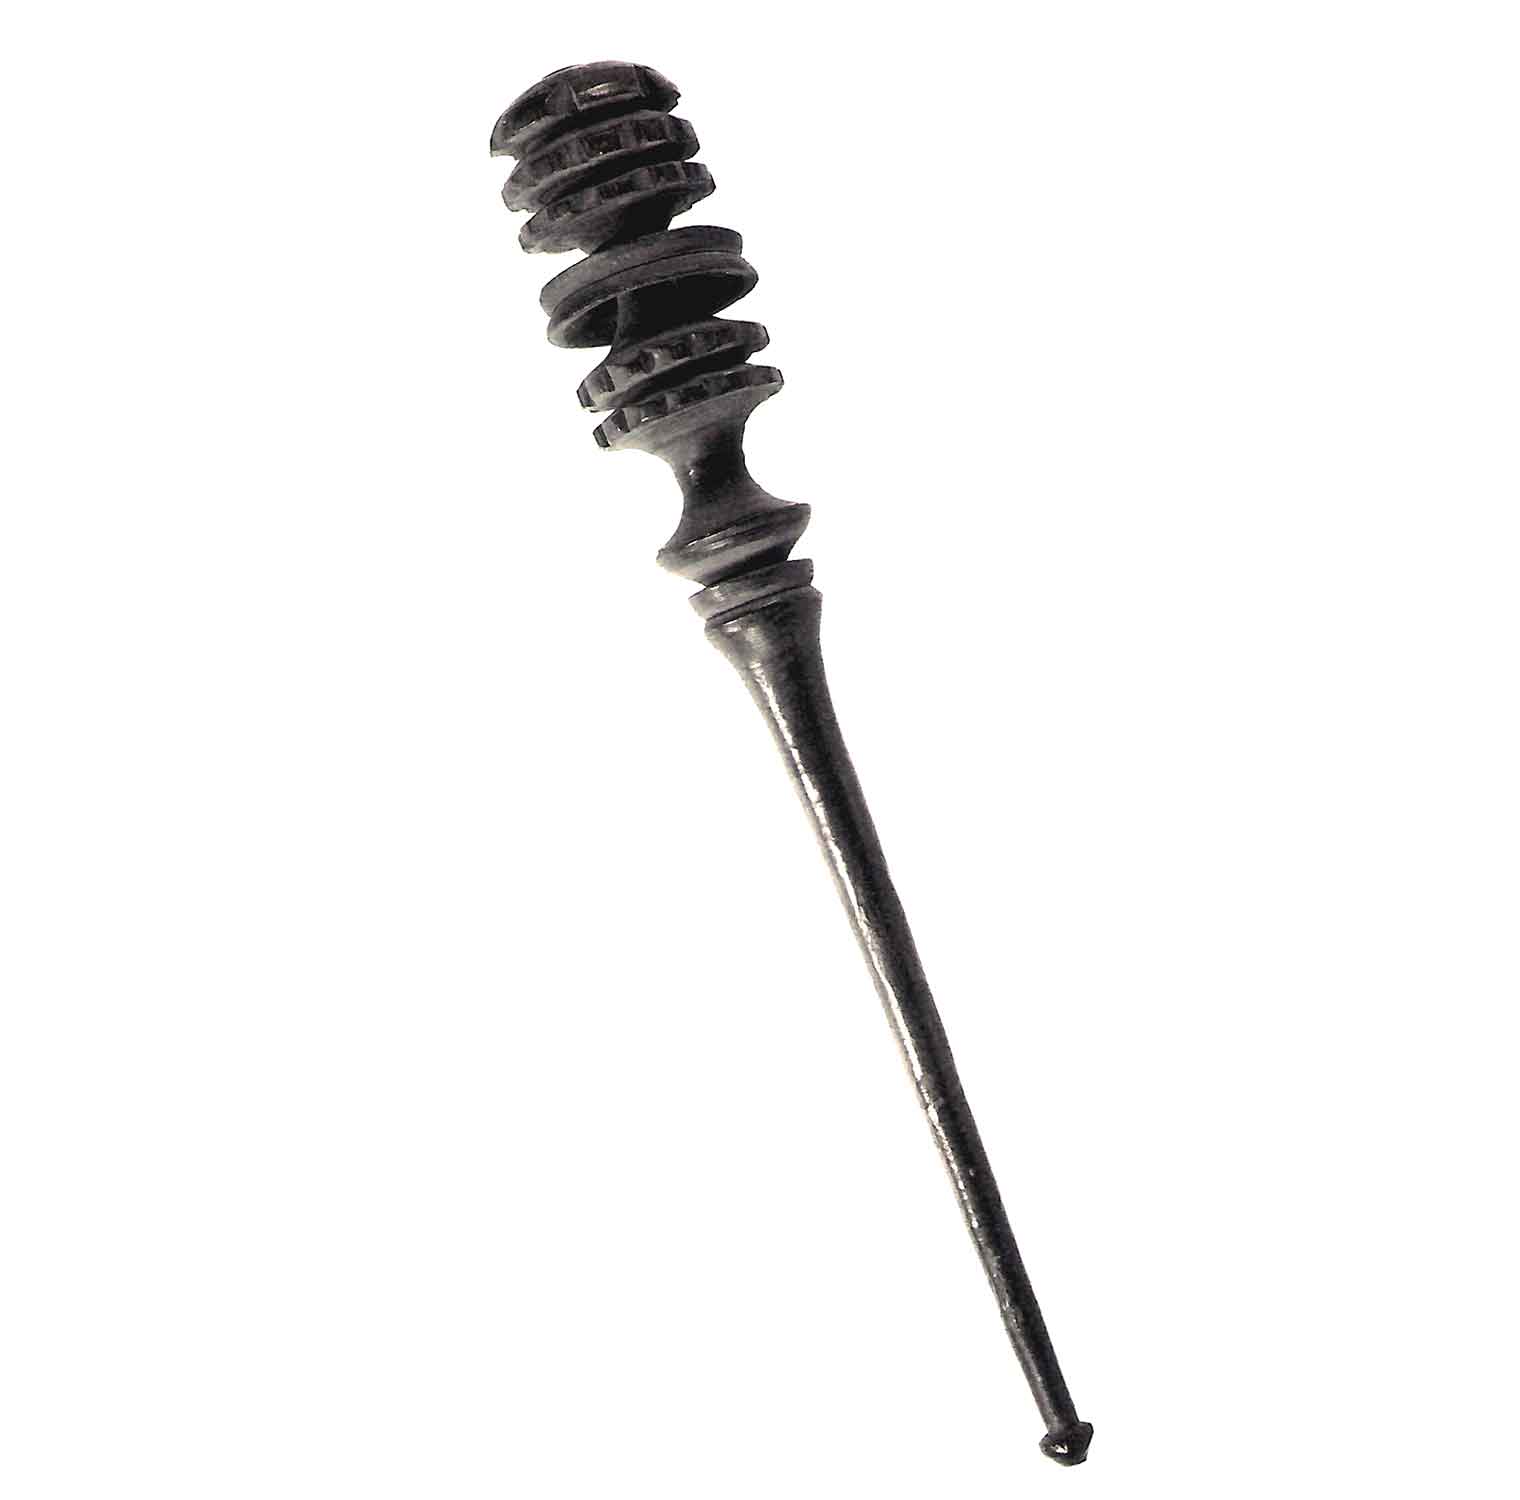
Molinillo (chocolate stirrer)/rattle. Mexico, late 19th century. Wood, L. 12 1/2 in. The Crosby Brown Collection of Musical Instruments, 1889 (89.4.1367)
What do you think this might sound like? When you’re drinking something warm, what do you use to stir it? Try using different items to stir and see what sounds you can make!
A molinillo is a traditional tool used in Latin America and the Philippines. It helps prepare hot beverages such as hot chocolate or cacao. To use the molinillo, you hold the long, thin end between your palms and rotate it by rubbing your palms together. This motion makes the drink frothy. This object is special because you can use it to whisk drinks and create music; it is also a rattle! There is even a popular nursery rhyme in Mexico about the molinillo called “Bate, Bate Chocolate” (mix the chocolate).
Prepare your own warm beverage and explore stirring sounds using a variety of different utensils.
Materials
• A warm beverage; be careful if it’s hot!
• Spoon
• Other items to explore stirring sounds (e.g. straw, wooden chopstick, etc.)
Learn more about other Latin American art with #MetKids!
Share what you make on social media @metmuseum and #MetKidsCreate or email your creation to familyprograms@metmuseum.org.
Celebrating with Symbols
Create a design using a word that is important to you!
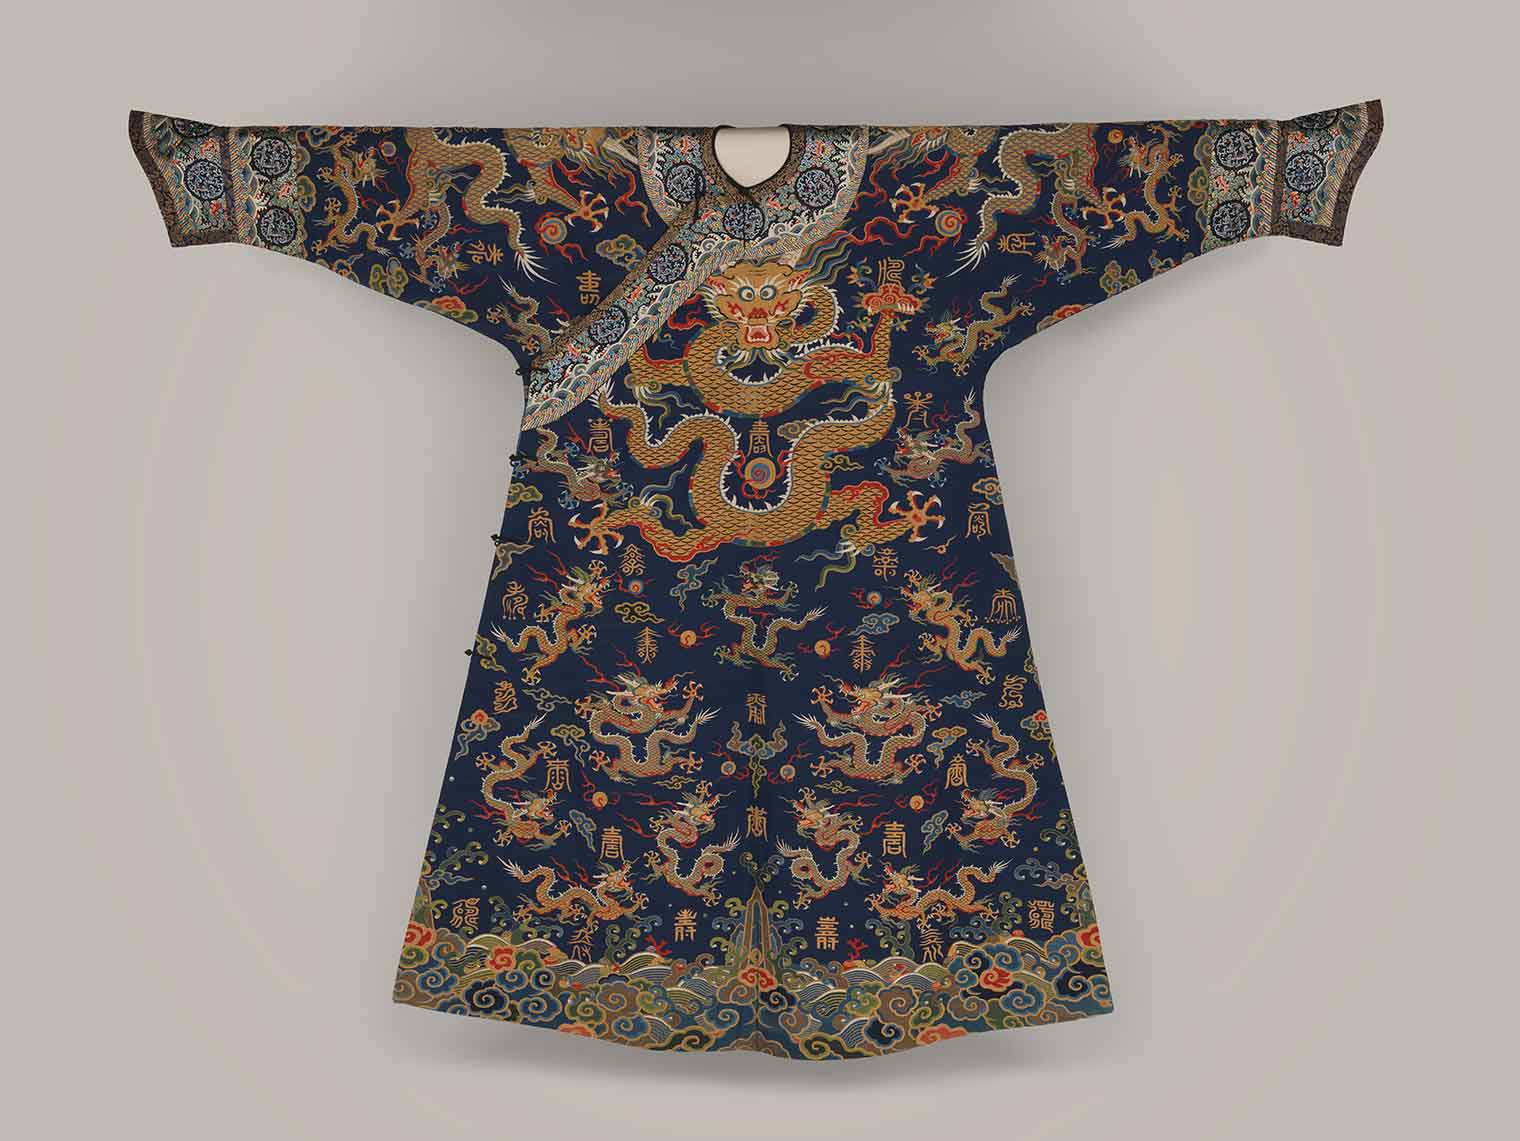
Imperial Court Robe. Chinese, 17th century. Qing dynasty (1644–1911). Silk and metallic thread tapestry (kesi), overall: 56 x 74 in. (142.2 x 188 cm). The Metropolitan Museum of Art, New York, Bequest of William Christian Paul, 1929 (30.75.5)
Look closely at this fancy silk robe covered in symbols! The five-clawed dragons represent the emperor and scattered among them are many variations of the Chinese character for long life, shou [SHOW]. The dragons chase flaming jewels as they fly through the dark blue sky. Hidden in the border designs along the chest, neck, and sleeves are bats, which are symbols of wealth and happiness. What colors do you see in the designs of this robe?
The emperor would not have worn this robe but someone important would have! What makes this robe so special? Who do you imagine wearing this robe?
Words can be used to create unique designs on clothes!
1. Think about a word or short phrase that is meaningful to you.
2. Using drawing materials, transform the word by writing the letters in different ways, playing with shape, size, or style on a piece of paper as practice.
3. Pick a few designs and redraw them on another piece of paper to create a pattern that would be interesting on a piece of clothing.
4. Use fabric markers to transfer a design to a shirt or another piece of clothing.
5. Wear your design on a special occasion!
Materials
• Paper
• Pencil, crayons, or other drawing materials
• Fabric markers
• Piece of clothing
Learn more about this robe with #MetKids!
Share what you make on social media @metmuseum and #MetKidsCreate or email your creation to familyprograms@metmuseum.org.
Special Delivery
Decorate a case to hold your important belongings!
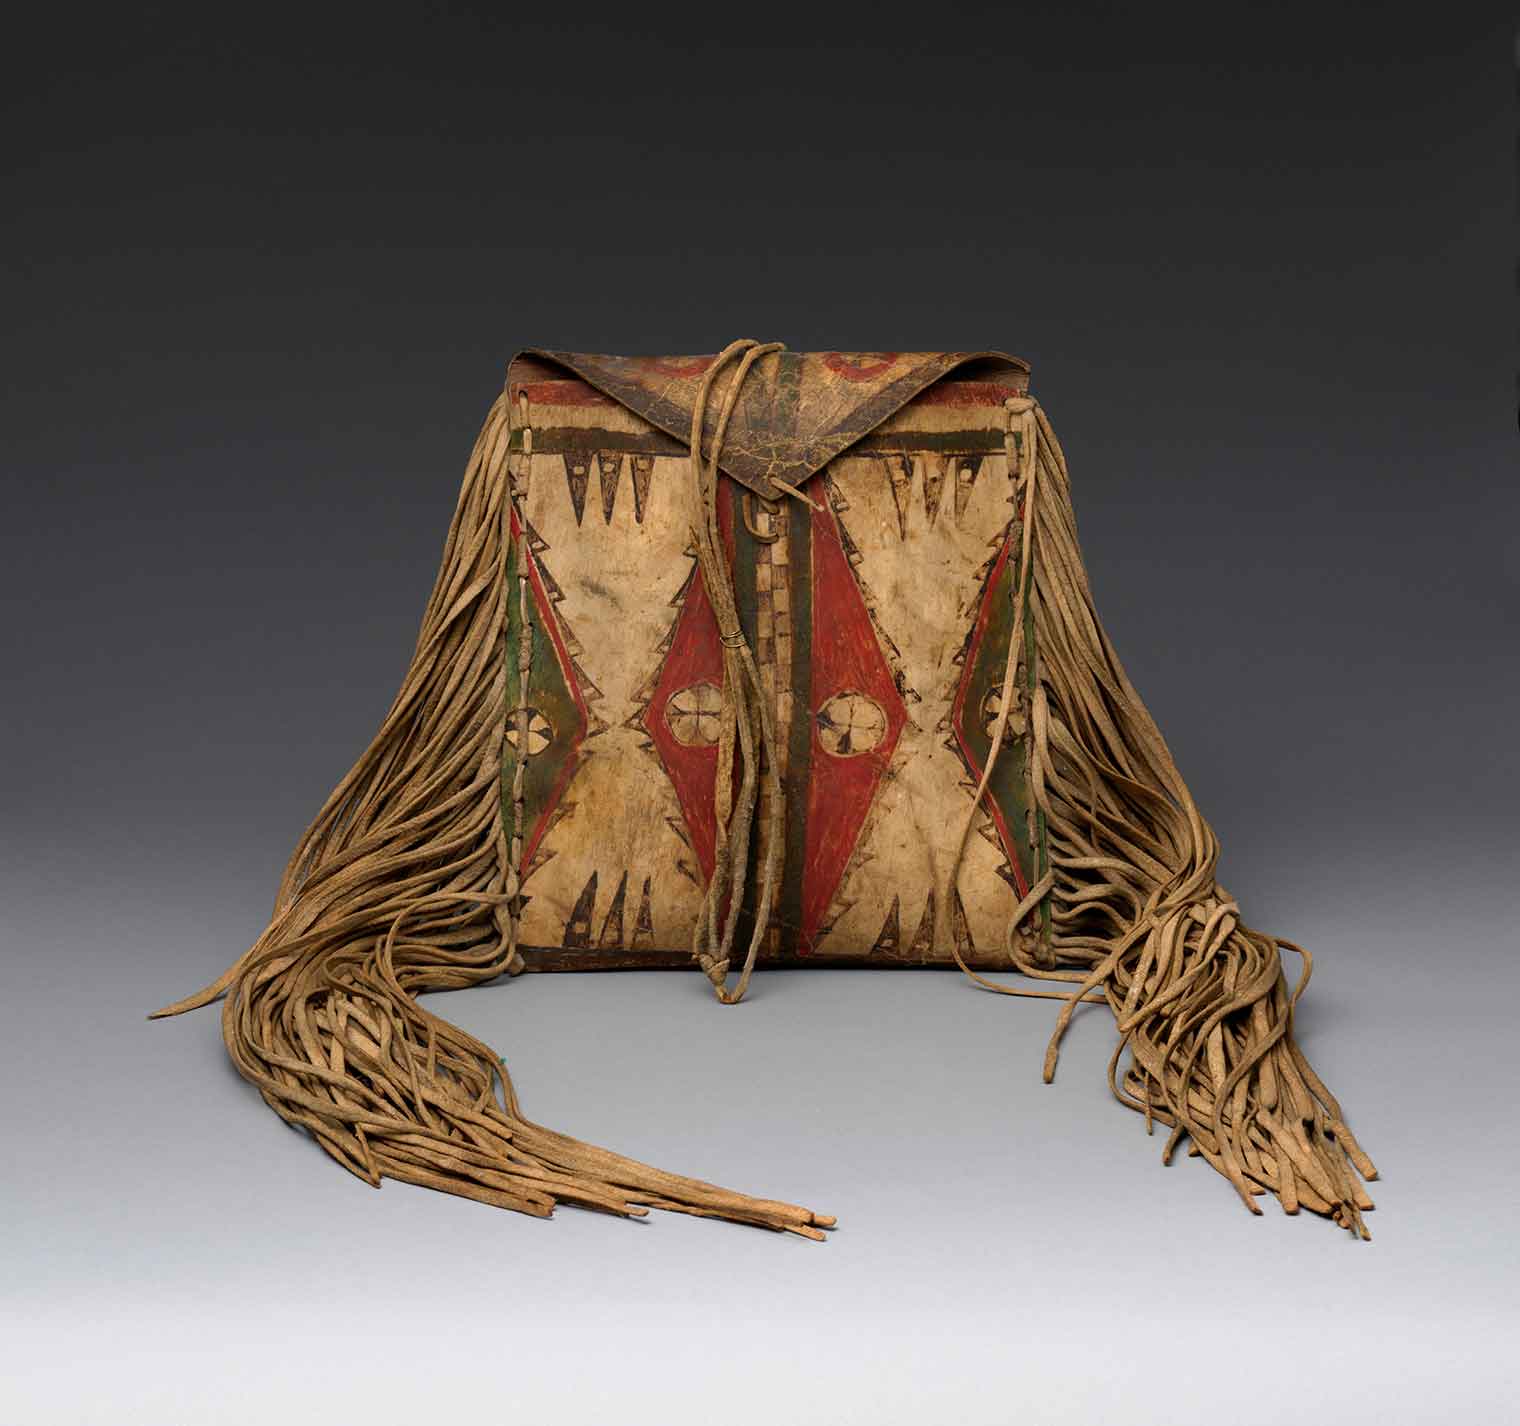
Parfleche flat case. Comanche, Native American, ca. 1850. Bison rawhide, pigment, and tanned leather, 33 × 11 1/2 in. (83.8 × 29.2 cm). The Metropolitan Museum of Art, New York, The Charles and Valerie Diker Collection of Native American Art, Gift of Charles and Valerie Diker, 2019 (2019.456.16)
Look carefully at this flat rawhide case called a parfleche. It was used to carry important belongings from one camp to another and was hung from the pommel, or the upward curve, of a saddle. The designs feature colorful geometric shapes and delicate, black and brown graphic elements.
The name parfleche originated with French fur traders. In French, parer means “defend” and flèche means “arrow.” This is a reference to the materials of the case being so tough that it was like a shield. If you were to touch this case with your hands, what do you think it would feel like?
Design your own flat case to hold your important belongings!
1. Cut a rectangular shape out of cloth and fold it in half.
2. Sew the two sides together. Don't forget to leave the top open.
3. For a flap, attach another piece of cloth to one side of the top and fold over.
4. Attach tassels to the sides by threading yarn or string on a large needle, pulling the yarn or string through the two layers of fabric to your desired length, and knotting the string. Another way you can add fringe is by gluing pieces of yarn or string to the bag.
5. Use fabric markers or paint to create a geometric design on the bag.
6. Once the bag is complete, put important belongings inside to carry from one place to another.
Materials
• Thick cloth like denim, leather, or neoprene
• Needles (small and large)
• Thread
• Yarn or other string to attach as tassels
• Glue (optional)
• Fabric markers or paint
Share what you make on social media @metmuseum and #MetKidsCreate or email your creation to familyprograms@metmuseum.org.
Fancy Helmet Designs
Use foil to create your own metal-like design!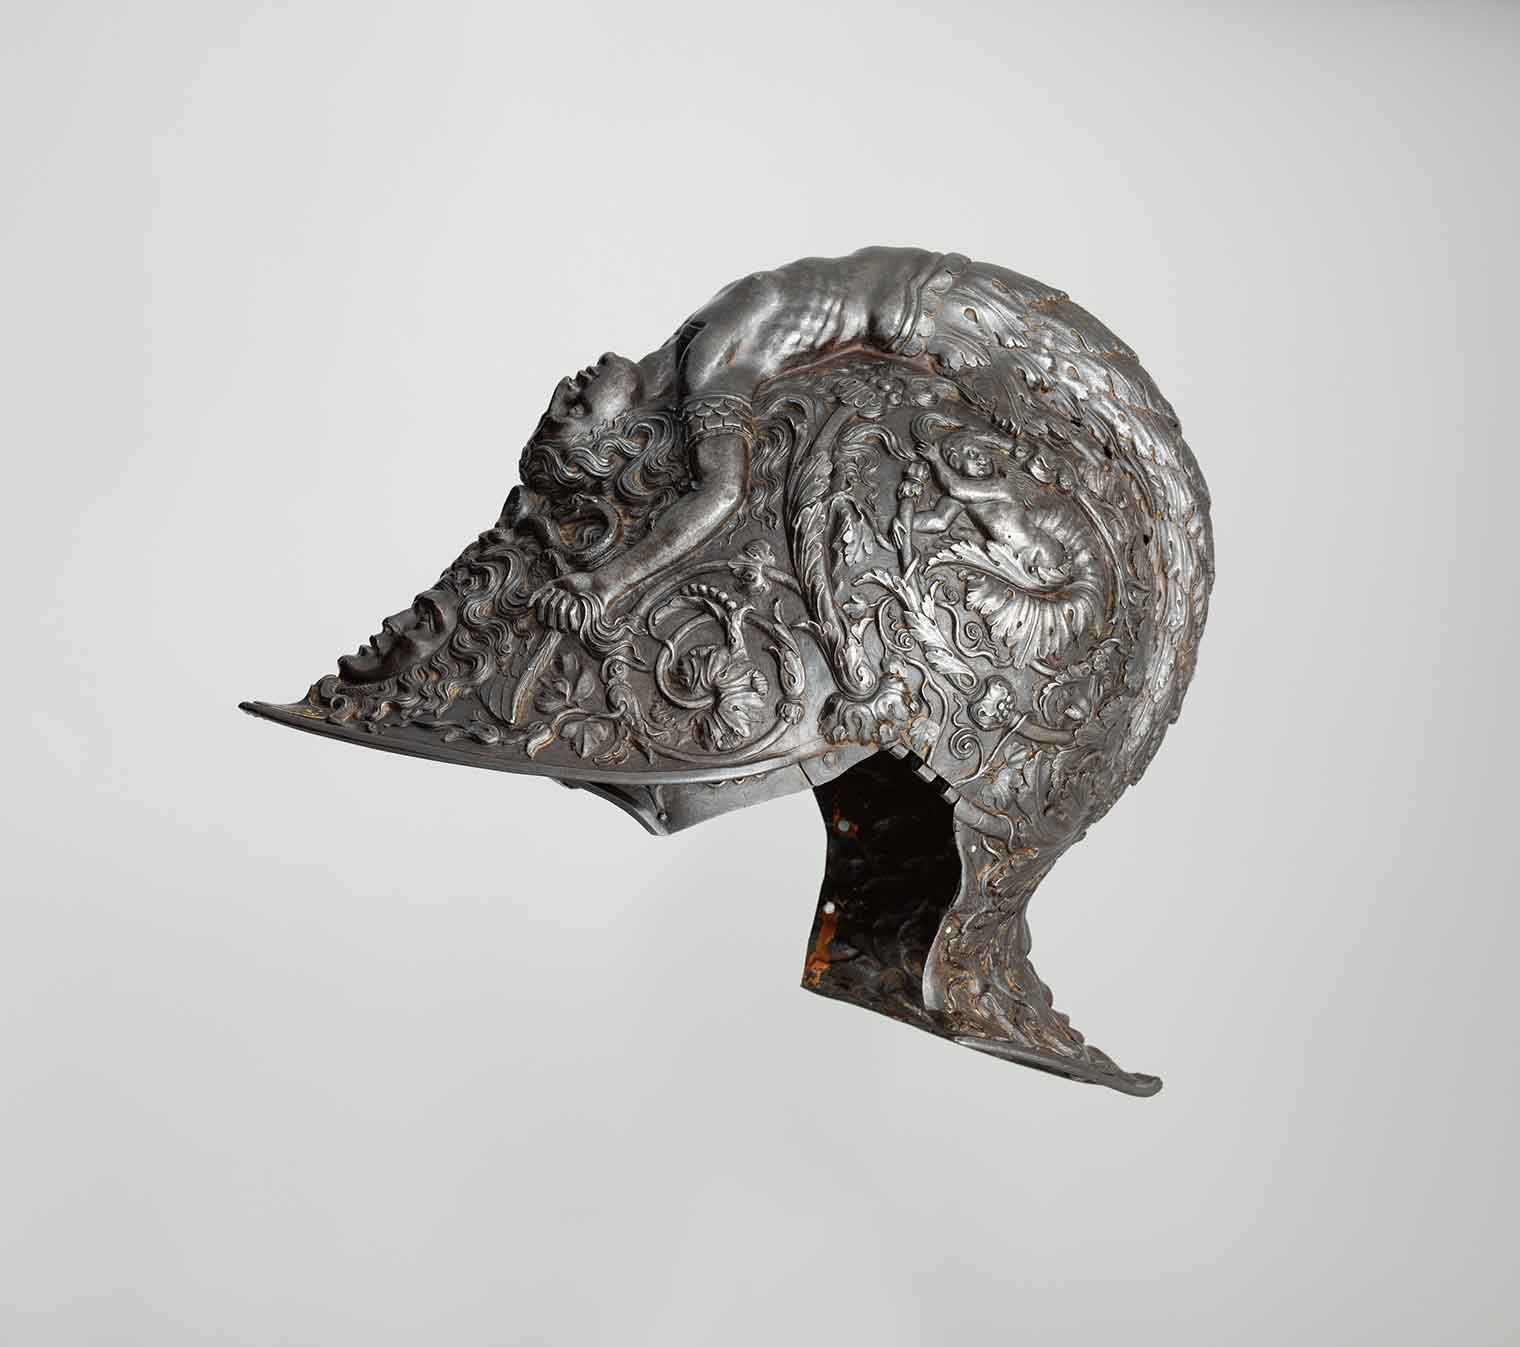
Burgonet. Italian, dated 1543. Armorer: Filippo Negroli (Italian, Milan ca. 1510–1579). Steel, gold, textile, H. 9 1/2 in. (24.1 cm); W. 7 5/16 in. (18.6 cm); D. 11 1/2 in. (29.2 cm); Wt. 4 lb. 2 oz. (1871 g). The Metropolitan Museum of Art, New York, Gift of J. Pierpont Morgan, 1917 (17.190.1720)
This spectacular helmet was not made for wearing in battle but for showing off at a parade or a tournament. Filippo Negroli designed this helmet so that the long body of a mermaid forms the ridge along the top. There's another female mythological creature on the front of the helmet: Medusa. She had wild hair of live snakes. One glance at Medusa's face could turn men into stone.
On the back of the helmet, which curved over the back of the neck, is a strange-looking face. Do you think the artist meant the face to be funny? Scary? Or something else?
Create your own metal design on foil!
All of the decorations on the helmet were made by embossing, or raising the surface of the steel.
1. Fold a piece of aluminum foil a few times.
2. With a dull pencil, outline your design.
3. Use the round side and the tip of a spoon to "emboss" the design from the back so it sticks out on the front.
4. To make a helmet, create a few designs and connect them using tape. Use a hat to create the shape of a helmet so you can wear your design!
Materials
• Foil
• Pencil
• Spoon
• Tape
• Hat (optional)
Learn more about this helmet with #MetKids!
Share what you make on social media @metmuseum and #MetKidsCreate or email your creation to familyprograms@metmuseum.org
Flipping Out About Flip Books
Explore motion through a flip book.
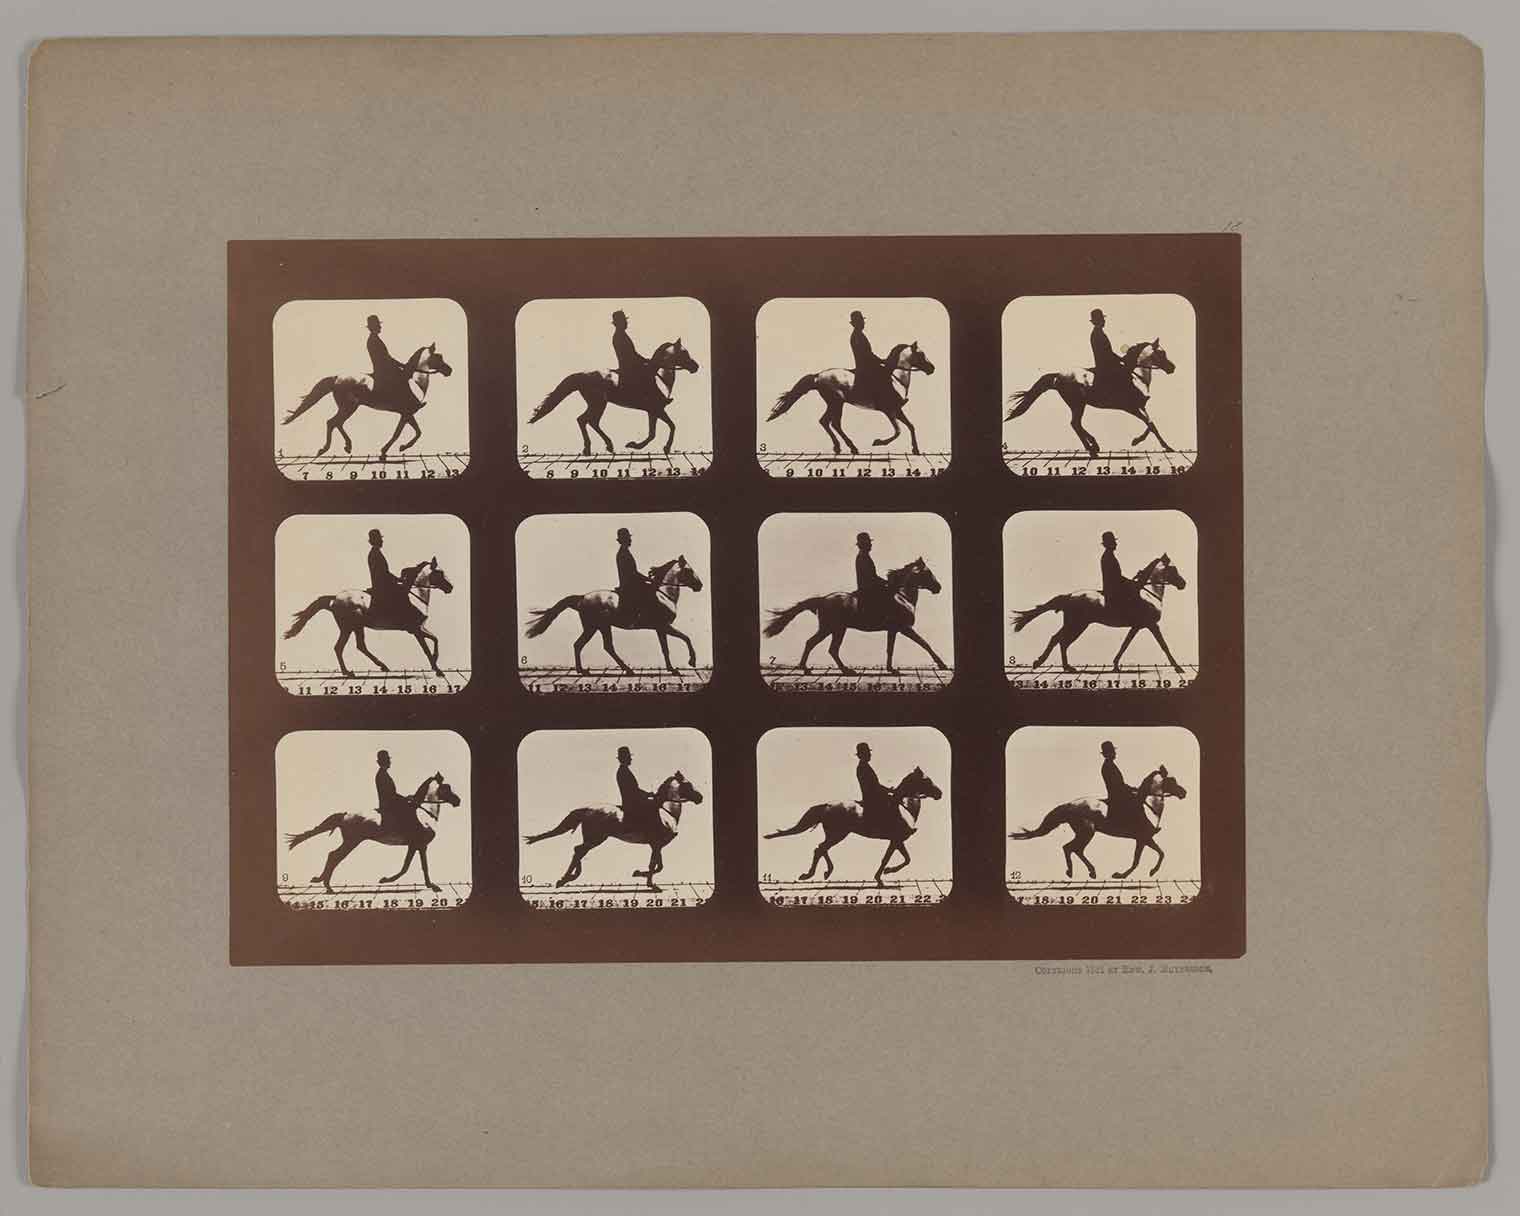
Eadweard Muybridge (British and American, 1830–1904). Attitudes of Animals in Motion, 1879, printed 1881. Albumen silver print, image: 6 5/16 × 9 15/16 in. (16 × 25.3 cm) mount: 8 13/16 × 12 5/8 in. (22.4 × 32 cm). The Metropolitan Museum of Art, New York, Gift of Joyce F. Menschel, 2015 (2015.778.33)
Photographer Eadweard Muybridge used a method he invented called stop-action photography to capture images of a horse galloping. The photos, which froze moments in time, allowed him to see the horse in positions that were previously invisible to the human eye. Until Muybridge captured these images, people weren’t sure if a horse ever lifted all four feet off the ground at the same time while galloping. What differences do you notice about the horse in this series of photographs?
The photographer set up twenty-four cameras triggered either at timed intervals, or as the horse’s legs tripped a wire suspended above the ground, to capture these photos. What would it look like if he created images of a person in motion? Try to freeze your body in three different positions as you take a step forward.
Make a flip book!
1. Cut equal sized pieces of paper, either by cutting index cards in half or a sheet of printer paper into twelve equal pieces. You could also use a stack of sticky notes.
2. Each piece of paper will be one frame of your animation. Every drawing should be similar, but with some differences to create the effect of movement!
3. Assemble the flip book by laying the pieces of paper on top of each other in order, then stapling the pages together on one side.
4. Flip through the book. This will cause the drawing to look like it is moving!
Materials
• Paper (index cards, paper, or a stack of sticky notes)
• Pencil
• Stapler
• Eraser (optional)
• Scissors (optional)
Share what you make on social media @metmuseum and #MetKidsCreate or email your creation to familyprograms@metmuseum.org.
Whimsical Windows
Welcome the autumn leaves with a landscape full of warm light and design your own Tiffany-inspired stained glass window.
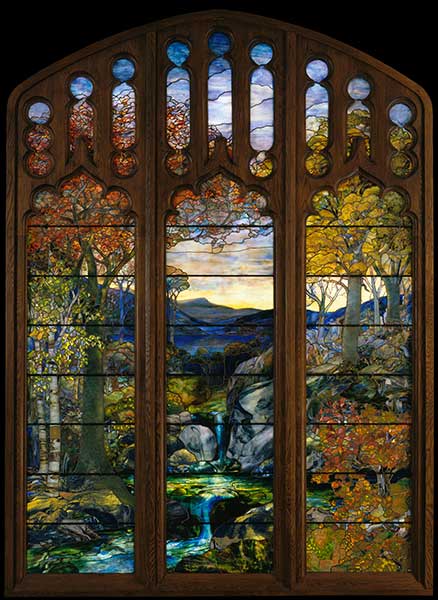
Autumn Landscape, Tiffany Studios (1902–32). Leaded favrile glass, 132 x 102 in. (335.3 x 259.1 cm). The Metropolitan Museum of Art, New York, Gift of Robert W. de Forest, 1925 (25.173a–o)
Look at all the details in the trees, water, and sky. They were created using different techniques—like folding and wrinkling molten glass—that Louis C. Tiffany and his team developed at Tiffany Studios for stained glass windows. One of the ways these glass artists were able to get such a variety of colors without paint was by adding tiny flakes of colored glass into the surface of the window while it was still hot. Many of these new techniques were used to make the scene look true to life. For example, the mottled glass used for the yellow and orange leaves recreates sunlight coming through the trees; the confetti glass, with tiny flakes of glass in different colors, gives greater depth to the leaves; and the ripple glass used for the water gives a sense of the flow of a stream.
Imagine you are redecorating a room in your house or school. What kind of image in glass would you ask Tiffany Studios to create for your space?
Be inspired by Tiffany Studios and design your own colorful window!
1. Cut clear contact paper or acetate to the size you would like for your stained-glass art.
2. Cut or tear pieces of colored tissue paper.
3. Layer different colors of tissue paper on top of one another. Place them on top of the contact paper or acetate. (If you are using acetate, use tape to keep things in place.)
4. Tear and twist the paper to create effects like the ones Tiffany developed.
5. Once you are happy with your design, hang it in front of a window to get the full effect.
Materials
• Clear contact paper or acetate
• Colored tissue paper
• Scissors
• Tape (optional)
Learn more about this stained glass with #MetKids!
Share what you make on social media using @metmuseum and #MetKidsCreate or email your creation to familyprograms@metmuseum.org.
The Powerful Leader in You
Celebrate Hispanic Heritage month by drawing a powerful portrait of yourself.

Mirror-Bearer. Maya, 6th century. Wood, red hematite, H. 14 1/8 x W. 9 x D. 9 in. (35.9 x 22.9 x 22.9 cm). The Metropolitan Museum of Art, New York, The Michael C. Rockefeller Memorial Collection, Bequest of Nelson A. Rockefeller, 1979 (1979.206.1063)
The person, a male, wears an elaborate knee-length woven skirt with ties. The waistband of the skirt has a braided and fringed design with circular rosettes on the hips and at the spine. The Mirror-Bearer also wears a shawl that goes around his neck and falls through his arms. He arches his back, tilting his head upward. His upper arms are parallel to the ground and his feet are under his body. While you look at this figure, try to mimic the way he is sitting. How do you feel when you are in this position?
The notches in the figure’s skirt and under his arms would have held a removable plaque covered in a mosaic mirror. The mirror would have been placed at an angle that matched the angle of the viewer’s face. Imagine what a mirror would look like in this position. Why would someone want a mirror attached to a sculpture?
Mirrors were important to the Mayans (indigenous people from Mexico, Guatemala, Belize, Honduras and El Salvador) because they reflected the images of Mayan lords and ladies. Draw yourself with the help of a mirror!
1. Grab a mirror and place it at an angle where you can see your own reflection.
2. Draw a portrait of yourself looking powerful!
3. Add elements that celebrate your unique identity to express your power.
Materials
• Mirror
• Paper
• Pencil, crayons, or other drawing materials
Share what you make on social media @metmuseum and #MetKidsCreate or email your creation to familyprograms@metmuseum.org.
Musical Sounds
Make an instrument with objects you have at home or find outside!
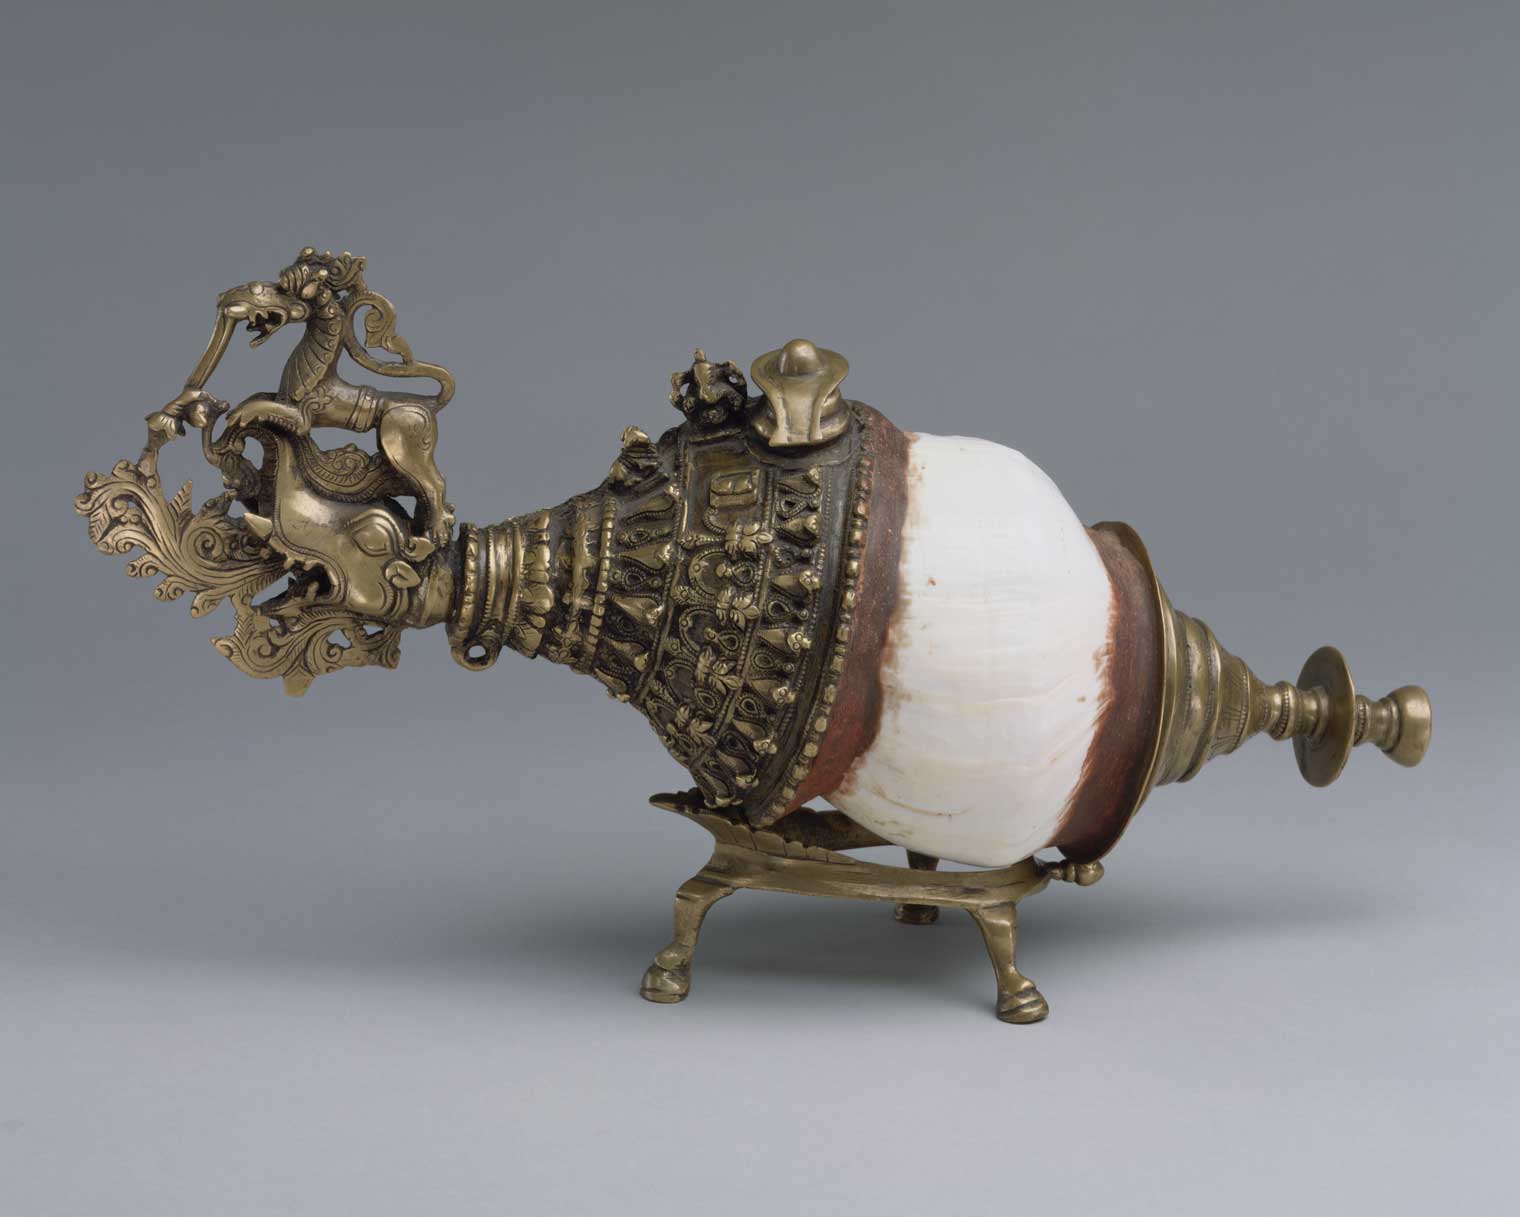
Śankh, 19th century. Kerala State, India. Shell (Turbinella pyrum), brass, wax, ankh: 6 × 6 × 16 3/4 in. (15.2 × 15.2 × 42.5 cm), stand: 2 1/4 × 4 3/4 × 5 3/4 in. (5.7 × 12.1 × 14.6 cm) The Metropolitan Museum of Art, New York, Purchase, The Barrington Foundation Inc. Gift, 1986 (1986.12)
This sankh, or shell trumpet, has a lot of showy brass decoration, but the secret to playing it is the ordinary conch shell in the middle! Almost every inch of the front of this instrument is covered with molded creatures and symbols from Hindu mythology. What animals and symbols do you notice?
When you blow through the mouthpiece of a sankh, it swirls around the curling shell and makes a sharp, loud sound. Imagine playing the sankh. What do you think this instrument would sound like?
Make your own musical instrument with objects you find at home or outside!
1. Look around your house, or while you're out for a walk, and find objects to use to make noise.
2. Experiment with different objects and test how they sound. Try tapping, blowing, or adding strings.
3. Decorate your instrument.
4. Create a single instrument or a full at-home band!
Materials
• Found objects that make noise
• Paint, crayons, colored pencils, markers, or any other materials to decorate your instrument
Learn more about this musical instrument with #MetKids!
Share what you make on social media using @metmuseum and #MetKidsCreate or email your creation to familyprograms@metmuseum.org.
Caring Quilts
Celebrate women's right to vote by creating a paper quilt design.
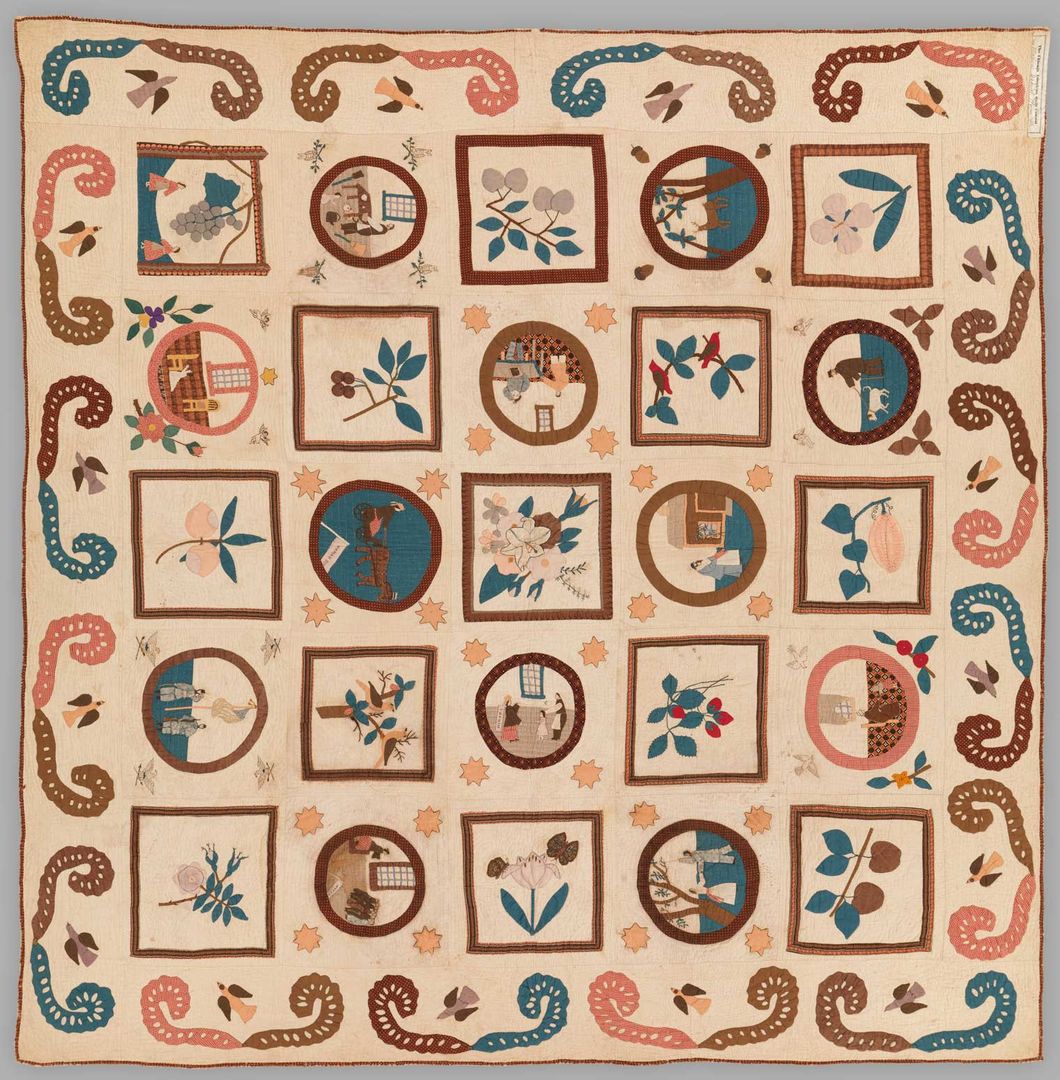
Emma Civey Stahl (American). Woman's Rights Quilt, ca.1875. Cotton, 70 × 69 1/2 in. (177.8 × 176.5 cm). The Metropolitan Museum of Art, New York, Funds from various donors, 2011 (2011.538)
This unique quilt full of hand-sewn pictures tells two stories. Three of the circular vignettes, or small illustrations, depict soldiers who fought in the American Civil War. Three other blocks feature dynamic scenes of social activism in the fight for women's rights. Look closely at the pictures. What symbols (pictures or words) do you see that help give clues about these stories?
Emma Civey Stahl made this quilt 45 years before the ratification of the Nineteenth Amendment to the United States Constitution, which gave women the right to vote. Why do you think Emma chose quilt making as the medium for the stories she wanted to tell?
Draw a series of artworks that tell a story about things you care most about!
1. Create a grid on your paper using a ruler or straightedge.
2. In the boxes of your grid, draw a series of circles and squares.
3. What do you care a lot about? Draw a different scene or object in each of the circles and squares on the page. Some of the shapes can represent a scene while others can be symbols.
4. Add patterns around the edges and color, if you like!
Materials
• Paper
• Colored pencils, markers, or other drawing materials
• Ruler or straightedge
Share what you make on social media using @metmuseum and #MetKidsCreate or email your creation to familyprograms@metmuseum.org.
Nautical Navigation
Chart your own course using found objects!
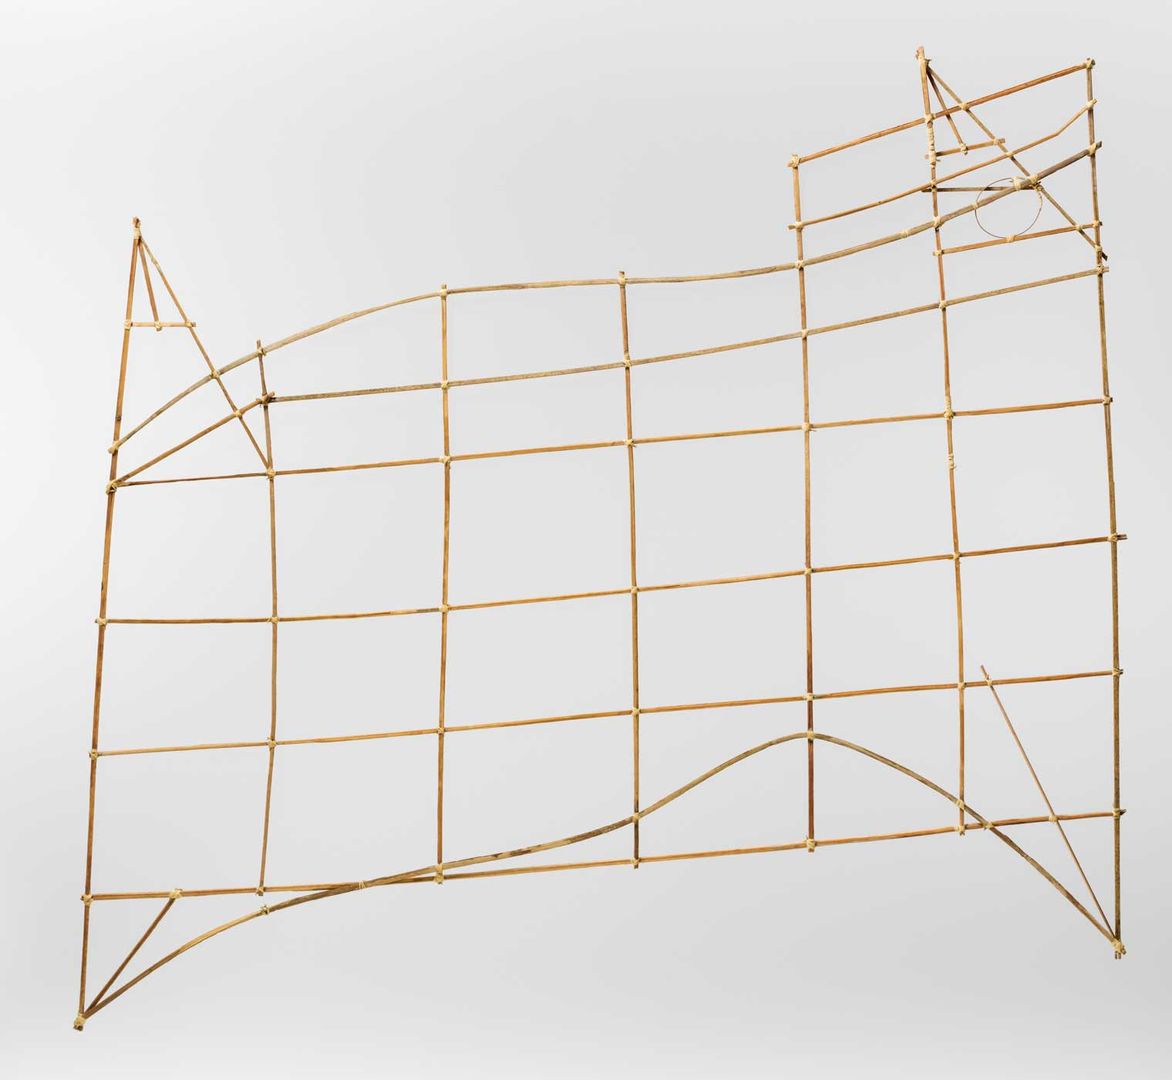
Navigational Chart (Rebbilib), 19th–early 20th century. Republic of the Marshall Islands. Coconut midrib, fiber, H. 35 1/4 x W. 43 1/4 x D. 1 in. (89.5 x 109.9 x 2.5 cm). The Metropolitan Museum of Art, New York, The Michael C. Rockefeller Memorial Collection, Gift of the Estate of Kay Sage Tanguy, 1963 (1978.412.826)
This might look like a simple arrangement of sticks, but it's actually a map of ocean currents! Long before GPS devices, people mapped and navigated the world using signs in nature like star patterns, the flight of birds, and the swell of ocean currents. The circle on the top right of this stick chart might represent an island, while the curved lines might show the way waves rebound off islands as water hits their shores.
This chart was used only on land, never on board a boat. An experienced explorer would memorize the map and be able to feel the waves rocking his canoe in order to reach his destination. Imagine you are an explorer on a journey, far from your final destination. What natural phenomena or landmarks would you use to guide your way?
Create your own map to chart directions between landmarks in your neighborhood using found objects.
1. Determine the boundaries of your map and create the shape with sticks. You can attach the sticks together with wire or pipe cleaners.
2. Add sticks to the inside of the shape to map out different areas.
3. Connect intersections using wire or pipe cleaners.
4. Explain your chart to a friend or family member, and challenge them to memorize and follow the path you’ve invented, if you like!
Materials
• Found objects, such as popsicle sticks, straws, or branches
• Wire or pipe cleaners
Learn more about the navigational chart with #MetKids!
Share what you make on social media using @metmuseum and #MetKidsCreate or email your creation to familyprograms@metmuseum.org.
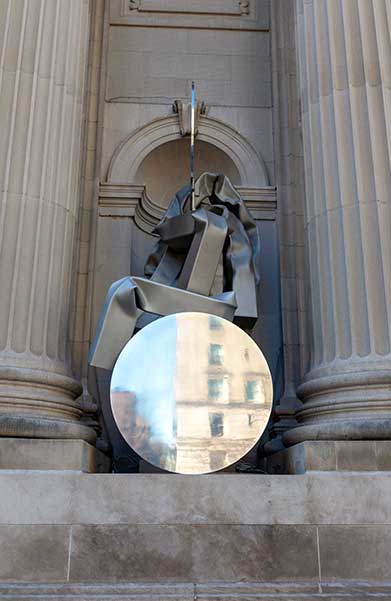
Carol Bove (American, born Switzerland). The seances aren’t helping I, 2021. Stainless steel and aluminum, 15 ft. 2 3/4 in. × 68 in. × 10 ft. 2 in. (464.2 × 172.7 × 309.9 cm). Courtesy of the artist and David Zwirner, The Metropolitan Museum of Art photo by Bruce Schwarz. (Due to rights restrictions, this image cannot be enlarged, viewed at full screen, or downloaded.)
The front of The Met Fifth Avenue is called the facade, meaning the face of the building. There are four niches, or recessed spaces, in the wall, which were originally made for statues but left empty. The Met asked artist Carol Bove to create four works of art to fill the spaces during 2021. The artist references the existing architecture and design of the facade in her new pieces. Look closely at the sculpture and the size of the aluminum disk. The diameter, or the width of the circle, is the same as the diameter of the columns on each side of the niche.
These four sculptures were made without any preparatory drawings! The artist used a full-sized model of the Museum's empty niches to construct four abstract sculptures made of sandblasted, contorted stainless-steel tubes and five-foot-wide reflective aluminum disks. How would you begin developing a sculpture for The Met's facade? Would you sketch out your ideas, or would you begin experimenting with materials at a full-scale size like Carol Bove?
Design your own sculptures for the facade of The Met Fifth Avenue.
1. Print out the template of an empty niche.
2. Draw or paint your proposal for a facade sculpture.
3. Repeat four times for the four niches on the front of the building!
Materials
• Printable template
• Paint, crayons, colored pencils, markers, or any other materials
Learn more about how The Met was built with #MetKids!
Share what you make on social media using @metmuseum and #MetKidsCreate or email your creation to familyprograms@metmuseum.org.
Wishful Weather
Create a work of art that represents your favorite weather!
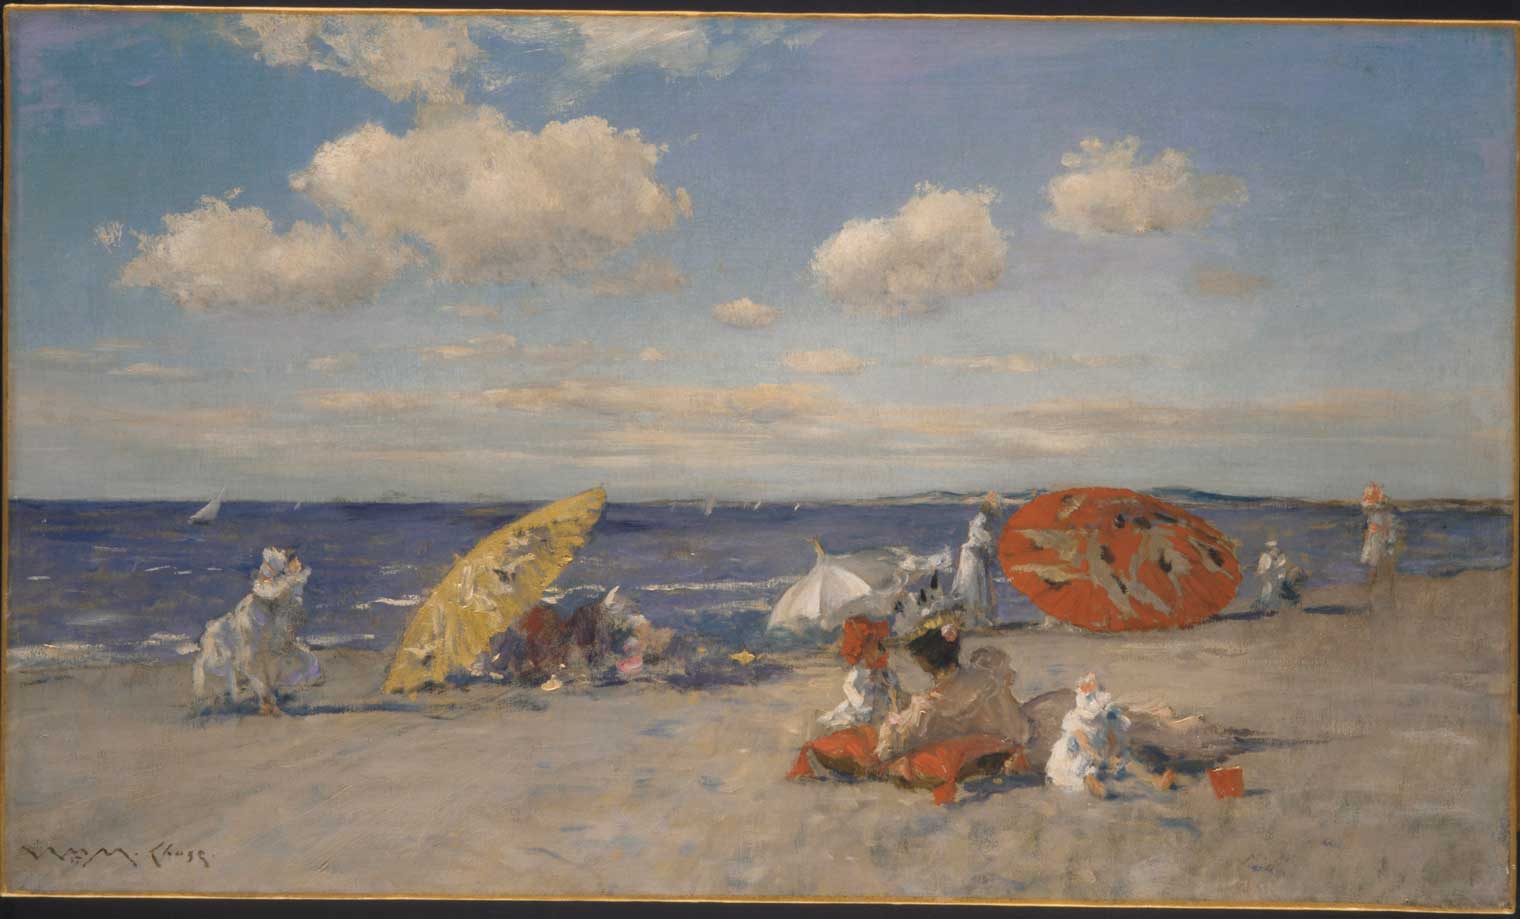
William Merritt Chase (American, Williamsburg, Indiana 1849–1916 New York). At The Seaside, ca. 1892. Oil on canvas, 20 x 34 in. (50.8 x 86.4 cm). The Metropolitan Museum of Art, New York, Bequest of Miss Adelaide Milton de Groot (1876–1967), 1967 (67.187.123)
In this painting, women and children rest on a beach, probably along Shinnecock Bay in Long Island, New York. William Merritt Chase painted this perfect site for leisure on a sunny day, filling half the canvas with sky. What colors or shapes do you see repeated in the sky and on the beach?
What activities do you think these beach lovers might be doing in this scene?
Make a work of art that highlights your favorite weather and outdoor activity.
1. Grab materials to create your picture. Choose your favorite type of weather or season, and an outdoor activity you like to do outside.
2. Draw a horizontal line in the middle of the page to divide the sky from the ground.
3. In the bottom half of the page, draw the activity that you like to do. Think about who you like to spend time with and add them into your picture.
4. Work on the sky in the top half of the page. What are the colors of the sky? How might the colors you use and formations of the clouds give us a clue about the weather?
Materials
• Paper
• Paint, crayons, colored pencils, markers, or any other materials
Share what you make on social media using @metmuseum and #MetKidsCreate or email your creation to familyprograms@metmuseum.org.
Cool Down
Celebrate National Ice Cream Day and get festive by making ice cream!
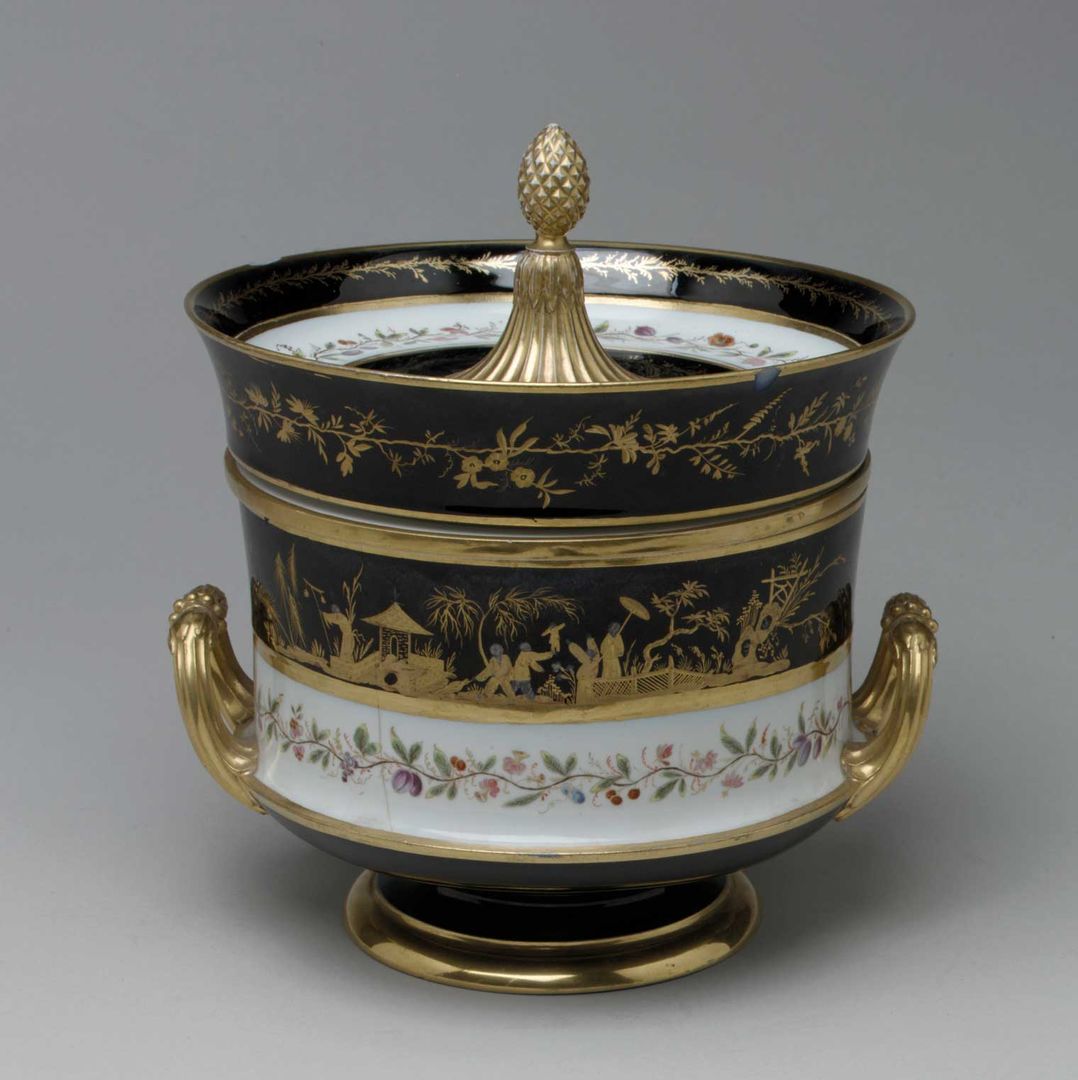
Sèvres Manufactory (French, 1740–present). Ice cream cooler, 1804. Hard-paste porcelain, height: 9 3/16 in. (23.3 cm) The Metropolitan Museum of Art, New York, Gift of Lewis Einstein, 1962 (62.165.43a–c)
This two-hundred-year-old French ice cream cooler is made of porcelain, a hard, white ceramic ware, but it is decorated to look like Asian lacquer, which dries quickly into a shiny layer, often on wood or metal. The cooler shows the European maker's appreciation of Asian art. What do you notice about the decorations?
The design of this cooler allowed for ice to be stored all around the ice cream, in both the container and the lid. Imagine you just inserted ice into the cooler. How cold would this feel? What flavor ice cream would you keep inside?
Make ice cream!
1. Pour whole milk, cream, vanilla extract, and sugar into a small resealable bag.
2. With an adult's help, remove extra air from the bag and seal it tightly. Make sure that it is closed!
3. Fill a large resealable bag halfway with ice and salt.
4. Place the small bag into the big bag, add a little more ice, and seal the big bag.
5. Using all your might, shake the big bag for 10 minutes, or until your milk and cream mixture looks like ice cream! You might want to wear gloves to keep your fingers warm.
6. Remove the little bag from the big bag and wash it off to make sure the outside isn't too salty.
7. Enjoy your ice cream, or store it in your freezer!
Materials
• 1/2 cup cream
• 1/2 cup whole milk
• 1 tablespoon sugar
• 1 1/2 teaspoons vanilla extract
• Ice
• 1/2 cup salt
• 2 resealable plastic bags (one large, one small)
• Gloves for chilly fingers, if you like
Share what you make on social media using @metmuseum and #MetKidsCreate or email your creation to familyprograms@metmuseum.org.
Heroic Stories
Celebrate Disability Pride Month with stories of heroes.
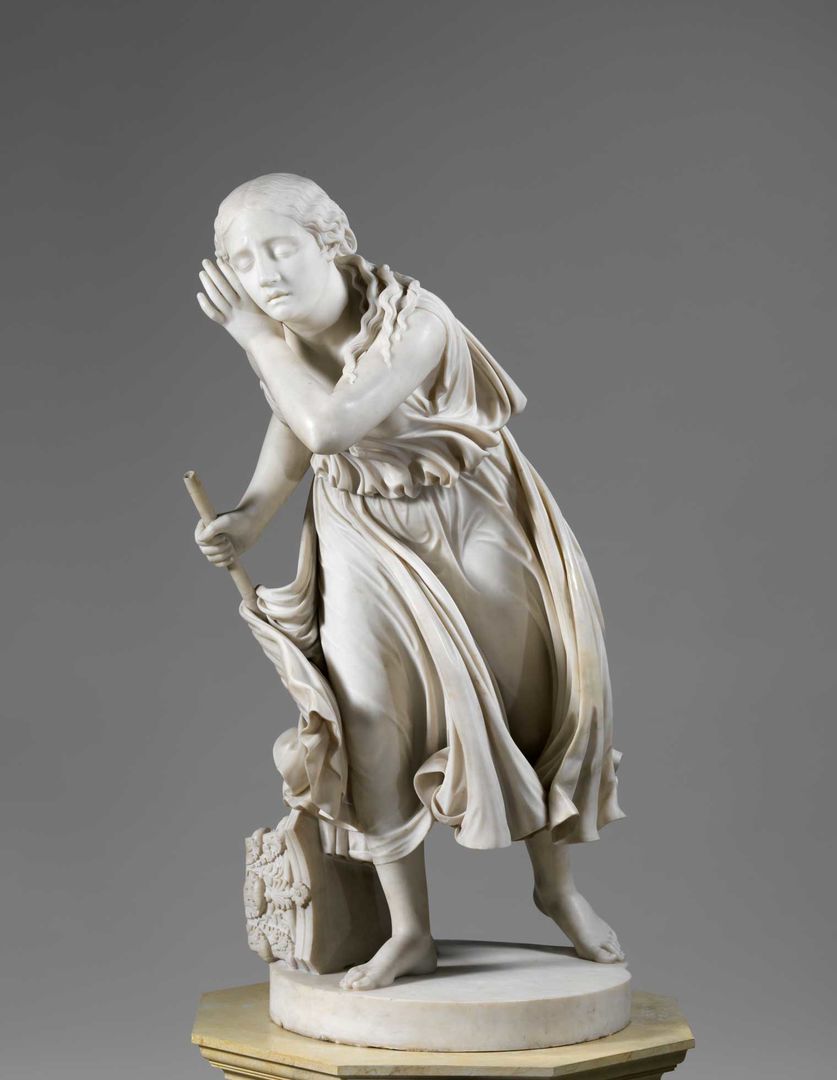
Randolph Rogers (American, Waterloo, New York 1825–1892 Rome), Nydia, the Blind Flower Girl of Pompeii, 1853–54; carved 1859. Marble, 54 x 25 1/4 x 37 in. (137.2 x 64.1 x 94 cm). The Metropolitan Museum of Art, New York, Gift of James Douglas, 1899 (99.7.2)
This sculpture represents a heroic girl, Nydia, who attempts to lead companions (not seen) out of the burning, ash-covered ancient city of Pompeii, which was destroyed by a volcano. The artist has included clues to tell us more about Nydia: her closed eyes and the staff in her right hand tell us she is blind, while the left hand raised to her ear represents her strong sense of hearing.
Randolph Rogers created this sculpture based on The Last Days of Pompeii (1834), a widely read novel. According to Rogers, his sculpture was so popular that artists replicated it 167 times! Why do you think this sculpture of Nydia was so famous?
Tell a story about a heroic person in your life!
1. Think about a person you know. What makes this person a hero?
2. Grab your pencil and paper.
3. Write and illustrate a story about why they are a hero.
4. Share your story with the heroic person!
Materials
• Paper
• Pencil or pen
Share what you make on social media using @metmuseum and #MetKidsCreate or email your creation to familyprograms@metmuseum.org.
Full House
Design a deck of cards inspired by The Met Cloisters collection.
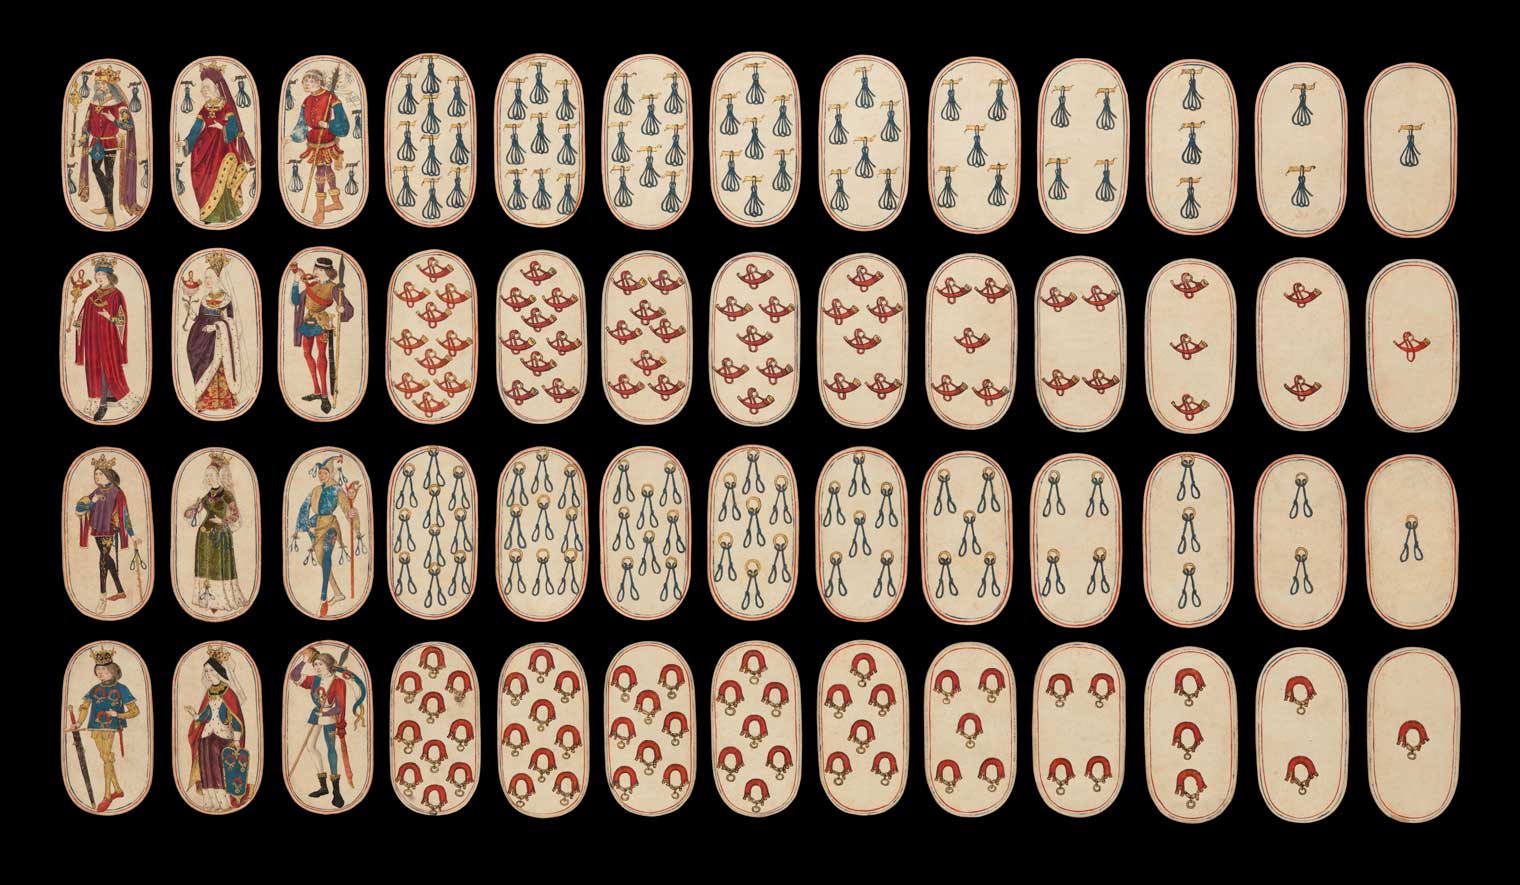
The Cloisters Playing Cards, ca. 1475–80. South Netherlandish. Paper (four layers of pasteboard) with pen and ink, opaque paint, glazes, and applied silver and gold, each: 5 3/16 × 2 3/4 in. (13.2 × 7 cm). The Metropolitan Museum of Art, New York, The Cloisters Collection, 1983 (1983.515.1–.52)
You're probably familiar with the four suits of modern playing cards: hearts, diamonds, spades, and clubs. Take at a look at this complete deck of cards from the 1400s, where the symbols on each of the suits are associated with hunting in medieval times: horns, dog collars, leashes, and nooses for the hunted birds.
What are games or activities that you like to do for fun? Think of four symbols, one for each suit of cards, to represent your favorite activities.
Design your own deck of cards.
1. Use cardstock or a recycled cereal box to draw a deck of cards. Each card should be around 2 3/4 by 5 1/4 inches.
2. Cut out your cards.
3. Draw your four suits, each with a king, queen, knave or jack, and ten counting cards. Remember to add your symbols to represent your favorite activities.
4. Use markers to add a pop of color.
Materials
• Cardstock or recycled cereal boxes
• Markers
• Scissors
Learn more about these playing cards with #MetKids!
Share what you make on social media using @metmuseum and #MetKidsCreate or email your creation to familyprograms@metmuseum.org.
Noisy Celebration
Create your own noisemaker inspired by a smiling figure.

"Smiling" Figure, 7–8th century. Mexico, Veracruz. Ceramic, H 18 11/16 x W. 11 3/4 x D. 6 1/4 in. (47.5 x 29.9 x 15.9 cm). The Metropolitan Museum of Art, New York, The Michael C. Rockefeller Memorial Collection, Bequest of Nelson A. Rockefeller, 1979 (1979.206.1211)
This smiling figure from the Gulf Coast of Mexico looks ready to get his groove on! He is decked out in party attire, with ear jewelry, a beaded necklace and bracelet, and body paint on his chest and face. What patterns do you see on his clothing? What do you wear for a special occasion?
With his wide grin, raised arms, and ritual rattle in his hand, this figure is ready to make some noise and move around. If this sculpture came to life, how would he move, and what might he say? What noise do you think the rattle would make?
Create your own festive noisemaker!
1. Create colorful designs on a piece of paper, then wrap it around a small cardboard tube so that some paper extends past both ends.
2. Cinch the paper on one end and tie it with a ribbon.
3. Fill the tube with a small scoop of rice, dried beans, beads, or buttons.
4. Cinch the paper on the other end and tie it with a ribbon to seal it. Add beads or other items to the ends of the ribbon for a special touch.
5. Shake your new noisemaker and dance away!
Materials
• Paper
• Colored pencils, markers, or other drawing materials
• Cardboard tube
• Rice, beans, beads, or buttons
• Ribbon
Learn more about this sculpture with #MetKids!
Share what you make on social media using @metmuseum and #MetKidsCreate or email your creation to familyprograms@metmuseum.org.
Passing Time with Shadows
Celebrate the summer solstice and track how time passes.
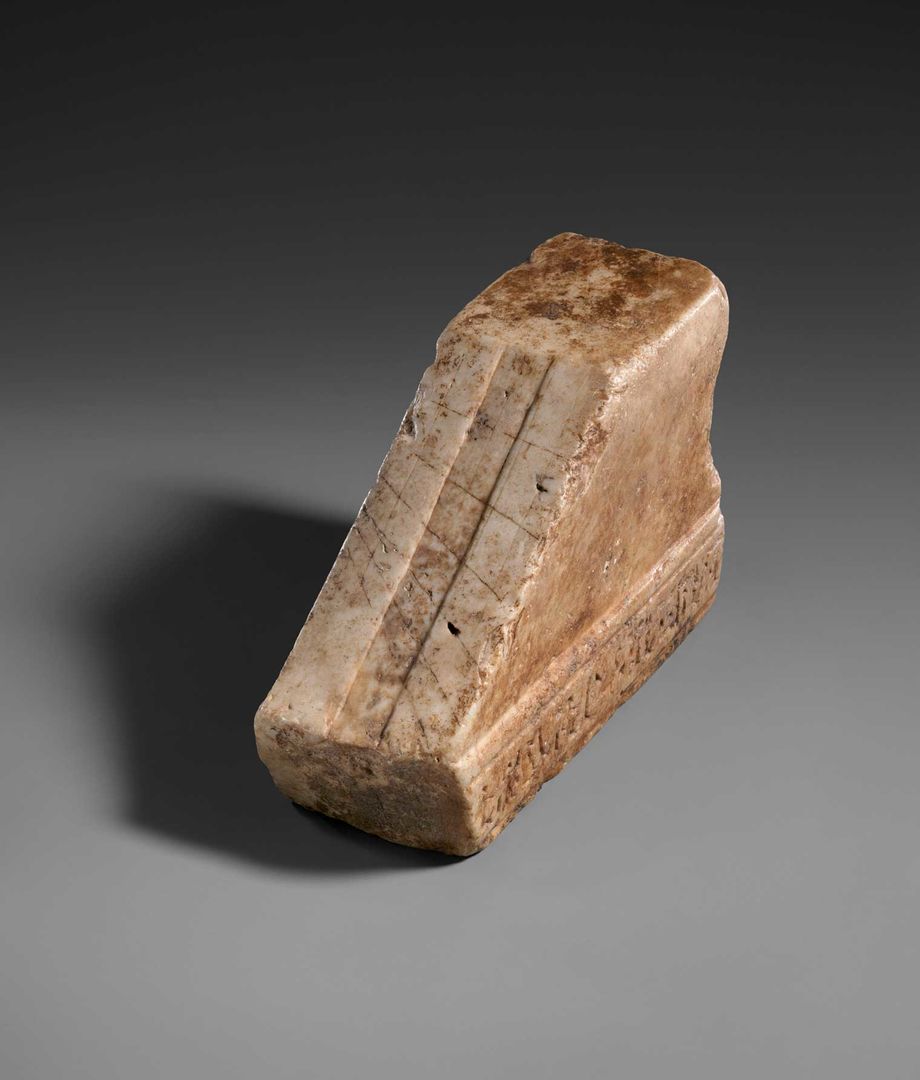
Shadow Clock, Ptolemaic Period, 306–30 B.C. Marble, H. 9.3 × W. 5.2 × D. 14.7 cm, 1.3 kg (3 11/16 × 2 1/16 × 5 13/16 in., 2.9 lb.). The Metropolitan Museum of Art, New York, Rogers Fund, 1912 (12.181.307)
Ancient Egyptians used the sun and shadows to tell time. How did this marble block help them? A second block called a gnomon would stand perpendicular to this piece and cast shadows on the slanted surface. The lines indicated the time like hands on a clock.
The summer solstice, or midsummer, is the longest day of the year and usually takes place during late June, marking the start of the summer. On a sunny day, how could you cast shadows like a gnomon? How does your shadow change at different times throughout the day?
Use the sun and your body or an object to tell the time throughout the day!
1. Go outside in the morning and stand in the sun. Notice your shadow! Or put an object next on the ground and observe its shadow.
2. Using chalk or string, trace the outline of the shadow you see.
3. In the middle of the day, go outside, stand in the same place or put the object in the same place, and trace the shadow again. Repeat it again later in the afternoon.
4. At the end of the day, look at the overlapping shadows. How did they change over the course of the day?
Materials
• An object that can stand on its own, or use your body
• Chalk or string
• Notebook for observation
• Pen or pencil
Share what you make on social media using @metmuseum and #MetKidsCreate or email your creation to familyprograms@metmuseum.org.
Inspiring Images
Honor Juneteenth by telling people about a cause you care about!
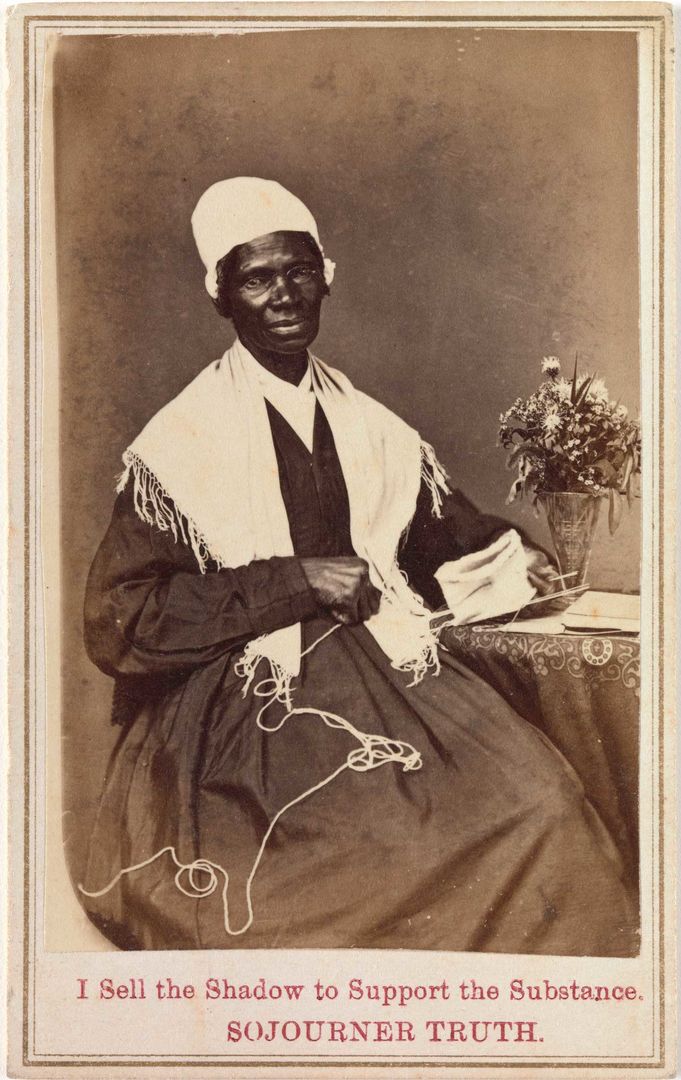
Photographer unknown, Sojourner Truth, "I Sell the Shadow to Support the Substance," 1864. Albumen silver print from glass negative, image: 8.5 × 5.4 cm (3 3/8 × 2 1/8 in.) The Metropolitan Museum of Art, New York, Purchase, Alfred Stieglitz Society Gifts, 2013 (2013.54)
In this photograph printed on a card, the antislavery activist Sojourner Truth pauses from her knitting and looks directly at the camera. On the table are a vase of flowers and a book. Printed in bright red ink below the photograph are the words, "I Sell the Shadow to Support the Substance." What might the objects on the table and the text below the image tell us about Sojourner?
Juneteenth, a combination of the words June and nineteenth, commemorates the anniversary of the declaration of freedom for enslaved people in Texas in 1885. Texas was one of the last states to uphold slavery in the United States. This picture was taken one year after the 1863 Emancipation Proclamation and two years before recorded Juneteenth celebrations began in 1886. Sojourner used this card to promote and raise money for many causes she supported. What causes are important to you?
Design your own card to promote causes you care about!
1. Think of a cause you would like to advocate for.
2. Draw picture of yourself or, if you can, print a copy of a photo of yourself.
3. Add items or symbols to your picture that represent what you care about.
4. Then add text to the bottom of your image to inspire others to support your cause. Think about what color to use for your text.
5. If you can, make copies of your image or draw multiple cards to share. See how your image inspires others!
Materials
• Paper
• Colored pencils
• Printer or scanner, if you have them
Share what you make on social media using @metmuseum and #MetKidsCreate or email your creation to familyprograms@metmuseum.org.
Fatherly Findings
Celebrate the men in your family by investigating old photos.
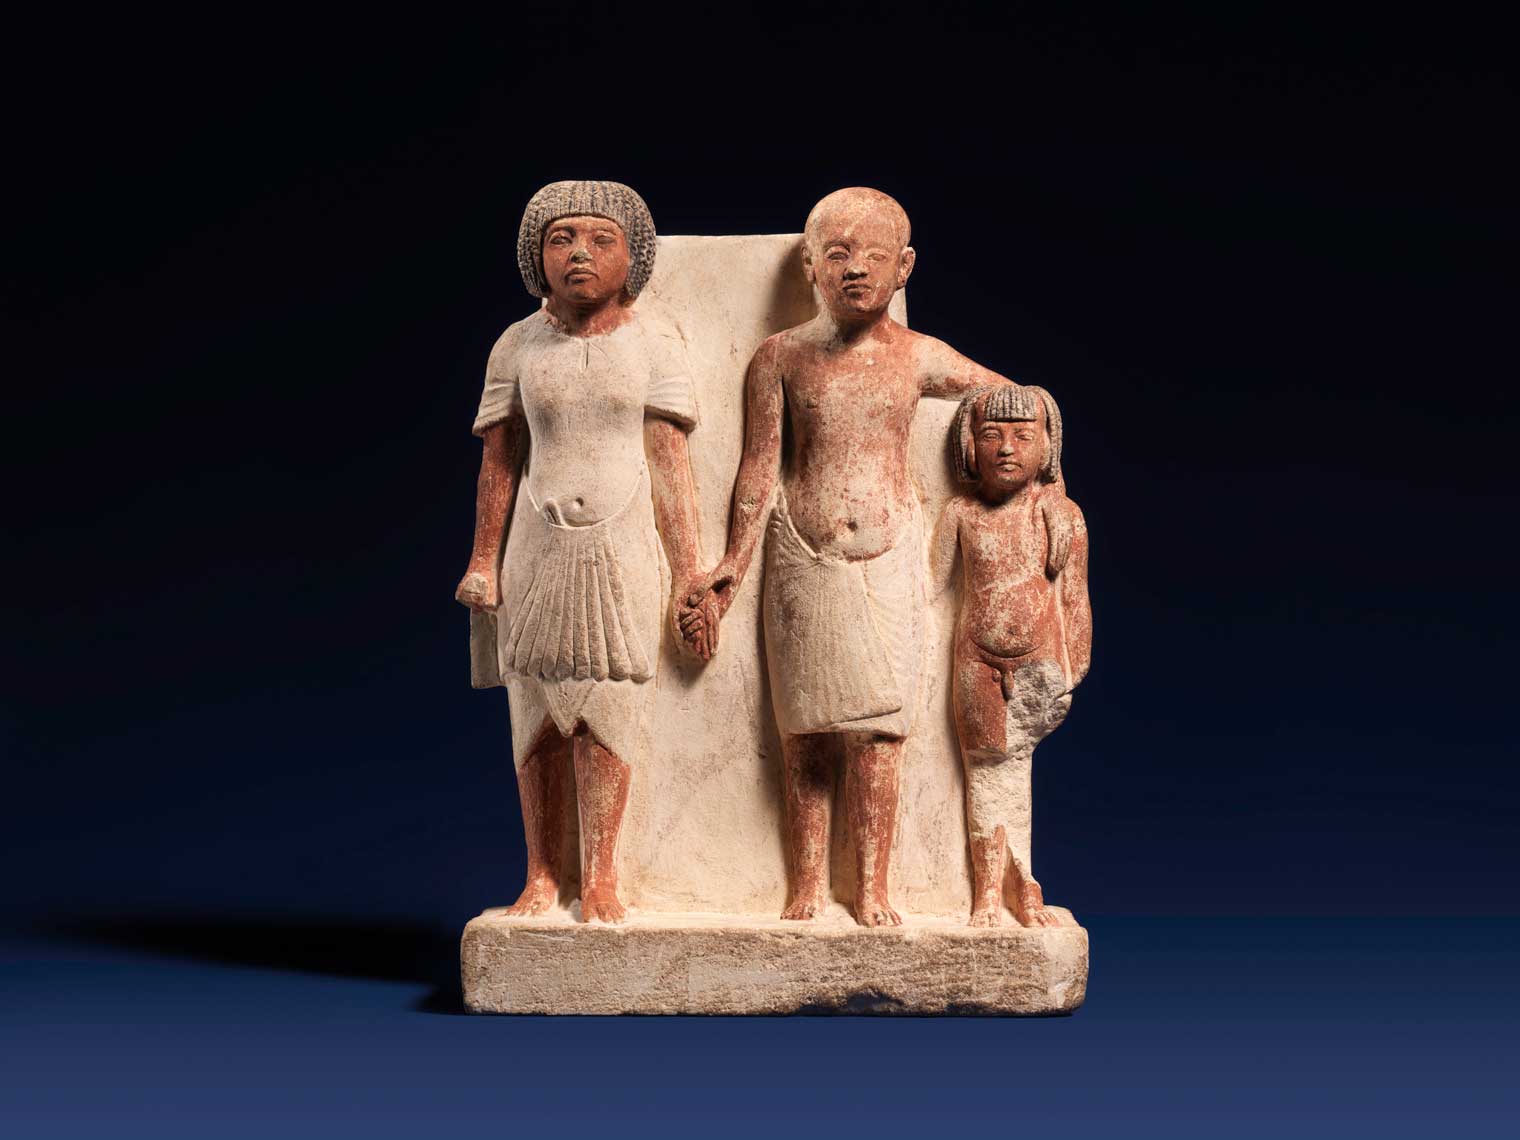
Statue of two men and a boy that served as a domestic icon, ca. 1353–1336 B.C. New Kingdom, Amarna Period. Limestone, paint, h. 17 cm (6 11/16 in); w. 12.5 cm (4 15/16 in). The Metropolitan Museum of Art, New York, Rogers Fund, 1911 (11.150.21)
This limestone sculpture probably depicts a family: a grandfather, father, and son. The man in the middle has a strong connection with both figures. He holds hands with the man on the left and drapes his arm over the boy on the right. This statuette likely held a place of honor in a household. Do you have a photograph of multiple generations of your family in your home?
Scientists used a special camera to discover that all three figures originally wore broad collars painted in Egyptian blue, the most widely used blue in ancient times. Over time, some of the pigment, or color, faded. Imagine you are in a scientific research lab. What clues do you see that help you guess more about the three figures?
Make new memories together while you uncover stories in old family photographs.
1. Collect old family photographs that include your father, grandfather, or another special man in your family.
2. Using a magnifying glass, look for clues about each individual.
3. Take notes and draw pictures to record your observations. What questions do you have about the photographs?
4. Sit down with your relatives to share your findings and ask questions.
Materials
• Photographs of your family members
• Magnifying glass
• Pencil
• Paper
Share what you make on social media using @metmuseum and #MetKidsCreate or email your creation to familyprograms@metmuseum.org.
Identity Pride Poems
Honor Pride Month by taking a closer look at an artist's life.
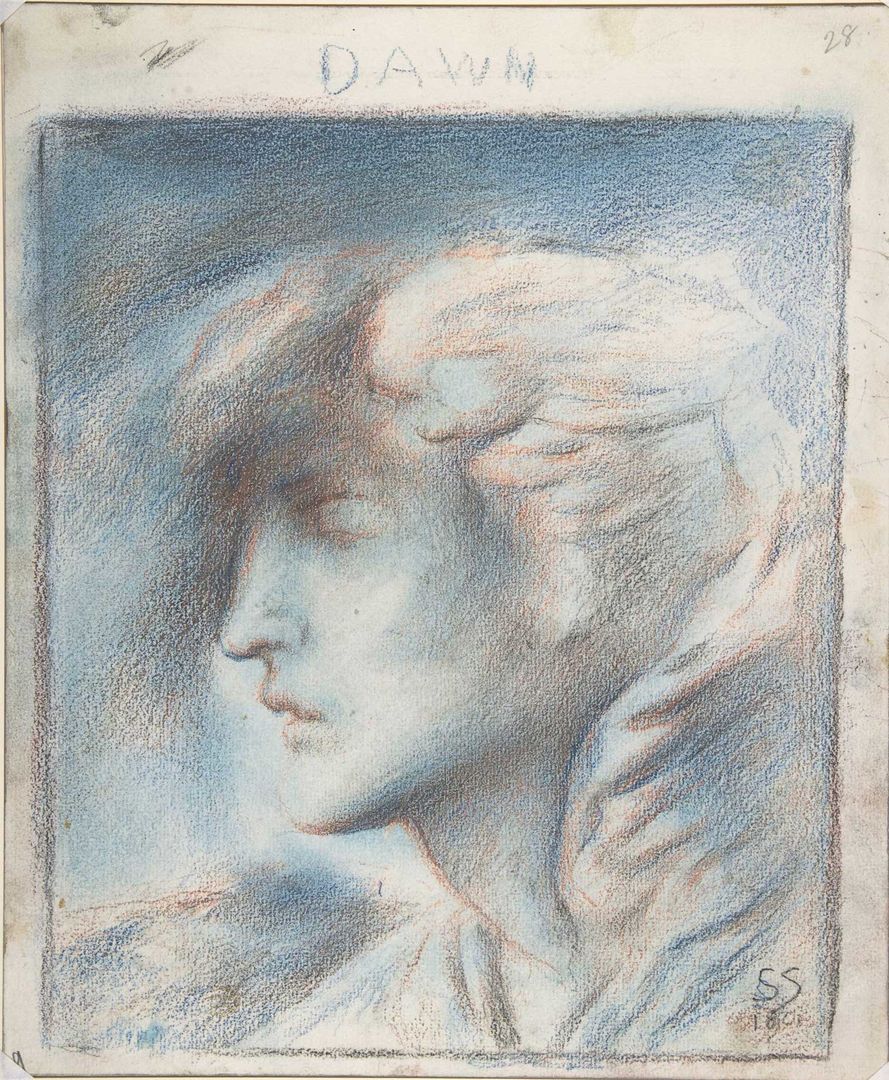
Simeon Solomon (British, London 1840–1905 London), Dawn (Head of Hypnos), 1901(?). Blue, red, brown and black chalk; framing lines in black chalk. Image: 11 1/4 x 9 1/4 in. (28.6 x 23.5 cm) Sheet: 12 15/16 x 10 11/16 in. (32.8 x 27.1 cm). The Metropolitan Museum of Art, New York, Rogers Fund, 1907 (07.283.7)
Look closely at the colors in this chalk drawing. The artist uses colors, lines, and shapes to show light and darkness. What colors do you see? How do these elements help build the form of the man’s profile?
June is Pride month, which honors and celebrates Lesbian, Gay, Bisexual, Transgender, and Queer/Questioning (LGBTQ) people and communities. Simeon Solomon, who made this drawing, was part of the LGBTQ community. He was inspired by a poem he wrote called "A Vision of Love Revealed in Sleep" (1871). He drew an image of Hypnos, the ancient Greek god of sleep. What stories or poems do you like to hear at night before falling asleep?
Write your own poem and bring it to life with a drawing!
1. Think about a part of your identity that you are proud of.
2. Write a short poem that celebrates who you are.
3. Create a work of art to display alongside your poem.
Materials
• Paper
• Pencil
• Crayons
Get inspired by this episode of Storytime with The Met.
Share what you make on social media using @metmuseum and #MetKidsCreate or email your creation to familyprograms@metmuseum.org.
Inspiration in Nature
Get outside and let the natural world inspire you!
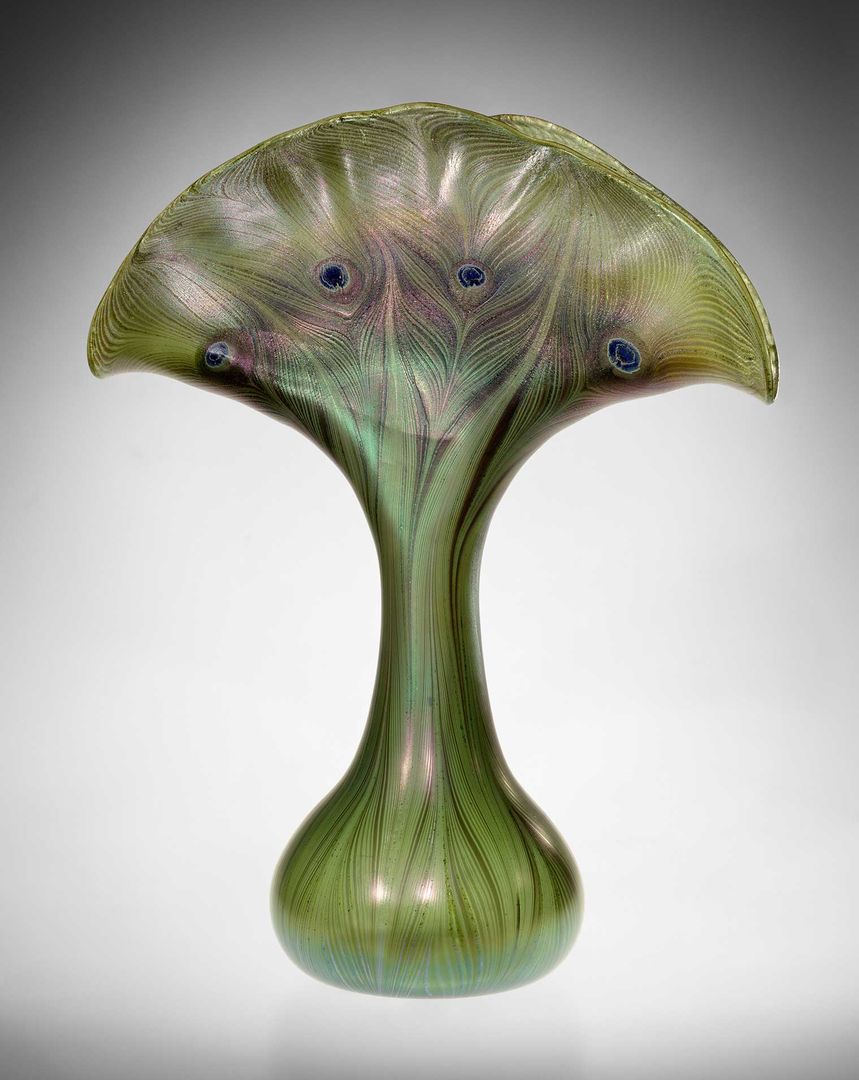
Louis Comfort Tiffany (American, 1892–1902), Vase, 1893–96. Favrile glass. 14 1/8 x 11 1/2 in. (35.9 x 29.2 cm). The Metropolitan Museum of Art, New York, Gift of H. O. Havemeyer, 1896 (96.17.10)
Louis Comfort Tiffany was an artist who worked in many different mediums, including glass, mosaic, pottery, metalwork, enamel, and jewelry. He chose to be an artist rather than joining the famous family business, Tiffany and Co.,a jewelry store that still exists today. Tiffany looked carefully at the world around him and recreated the look of nature in his glasswork. What colors do you see in this vase that you would find in nature? What do you think Tiffany saw in nature that inspired him to create this?
Learn more with #MetKids!
How is nature reflected in objects you have at home? Think about the shapes, colors, patterns, and textures you see in nature and look for them around your house!
Here’s a creative challenge for the next time you go for a walk outside with your adult. As you walk, notice the natural environment around you. What do you see that inspires you to make an artwork of your own? Talk about what you see. Document your inspiration with a camera or camera phone, if you like. When you get home, sketch an object inspired by what you saw.
Materials
- Paper
- Pencil
- Camera or camera phone, if you like
Share your inspiration photo or sketch on social media using @metmuseum and #MetKidsCreate.
Plant an Intention
Create and plant seeded paper to grow a hopeful landscape.
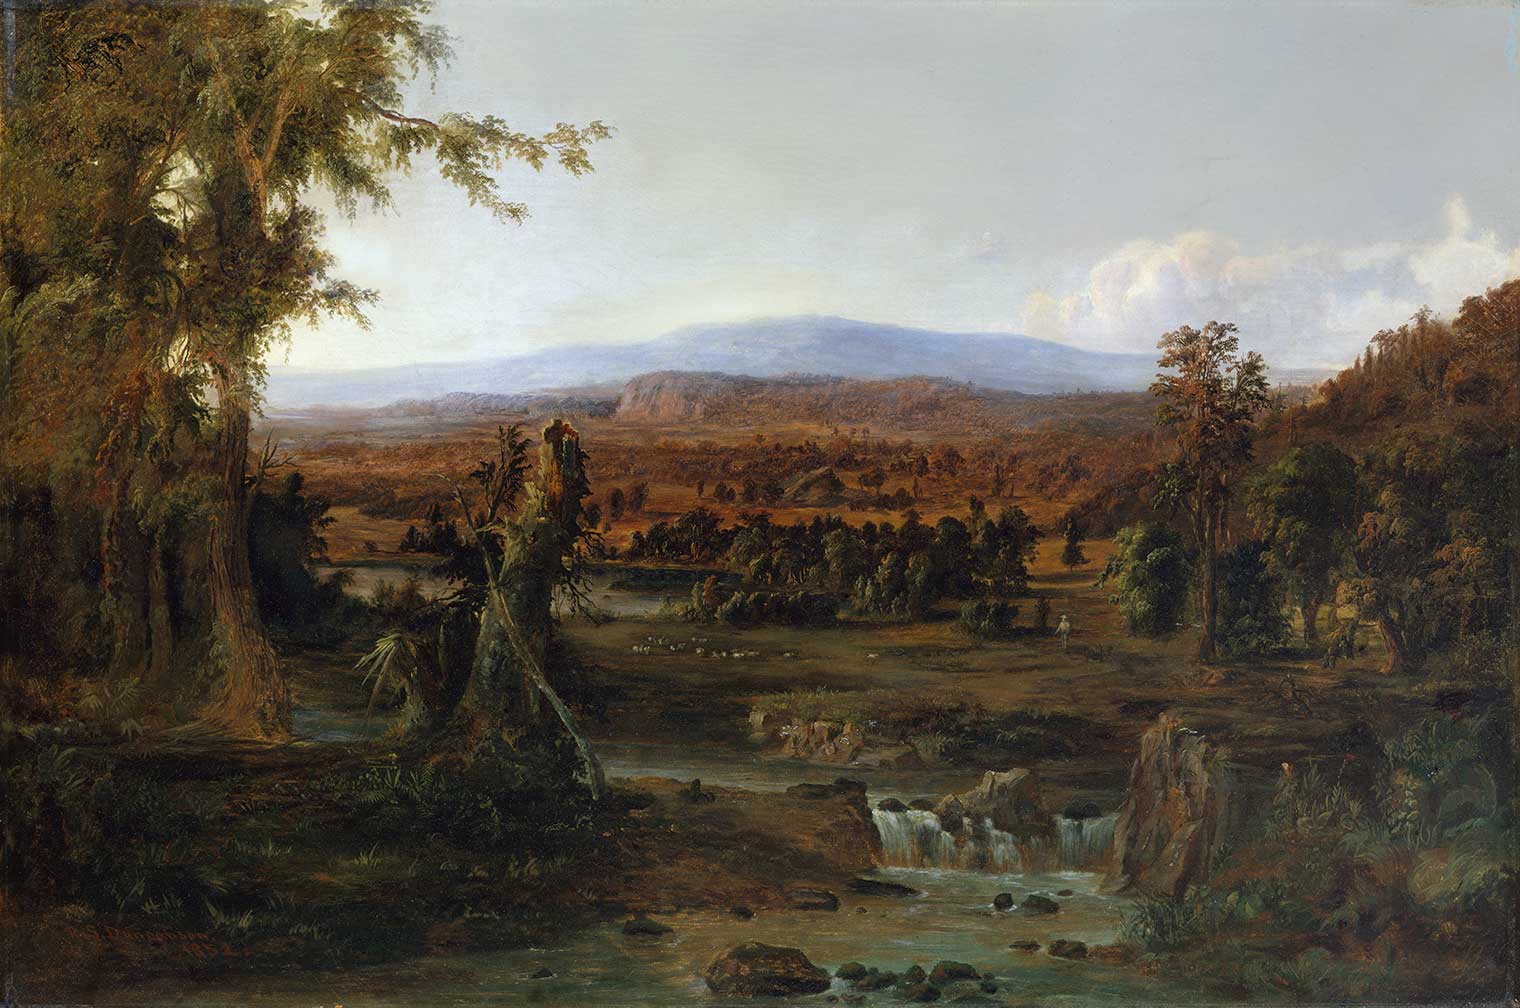
Robert S. Duncanson (American, 1821–1872), Landscape with Shepherd, 1852. Oil on canvas. 32 1/2 x 48 1/4 in. (82.6 x 122.6 cm). The Metropolitan Museum of Art, New York, Purchase, Gift of Hanson K. Corning, by exchange, 1975 (1975.88)
Painter Robert S. Duncanson was a mixed-race, self-taught artist of European and African ancestry. He was inspired by the land around him and painted many detailed landscapes, or pictures that depict the natural environment. Explore the plants and creatures hidden throughout this painting.
Duncanson was born a free man in 1821 and is considered the first internationally known African American artist. One of his paintings was displayed in the U.S. Capitol building during President Biden's inauguration in January 2021. What work of art would you choose to display on a special day?
Duncanson’s landscapes invite us to think about the importance of nature. Select a word that helps you find hope or power, such as love, care, grow, or bloom. Work together with an adult to turn this word into seeded paper that will grow into new life over time.
1. Gather paper and shred it using your hands or scissors. Try to avoid paper with a glossy finish.
2. Soak the shredded paper in a large bowl of water overnight. Stir it occasionally.
a. If you like, remove the excess water and place the mixture in a blender for 10–15 seconds. Blend until the texture is similar to a chunky soup. Add a small amount of water if it seems too dry.
3. The next day, mix in seeds slowly with a spatula.
4. Using your hands, flatten the paper mixture on a piece of cloth. Use small amounts until you have a large, thin rectangle.
5. Remove excess water by gently pressing with a second cloth or towel.
6. Leave the seeded paper in the sun to dry fully.
7. Write your word on the paper in block or bubble letters.
8. Cut your word out letter by letter with scissors.
9. Plant the cut-out word in soil, water regularly, and wait patiently for signs of growth. It may take a few days for seedlings to appear.
For more inspiration, check out this #MetKids blog post!
Materials
- Paper
- Pencil
- Large bowl
- 1/8 teaspoon plant seeds
- Spatula
- Two pieces of cloth or towel
- Scissors
- Blender, if you like
Share what you make on social media using @metmuseum and #MetKidsCreate. Tell us about your plants and why you decided to use your word.
A Colorful Garden Gathering
Dive into the details and draw part of a lively spring garden.
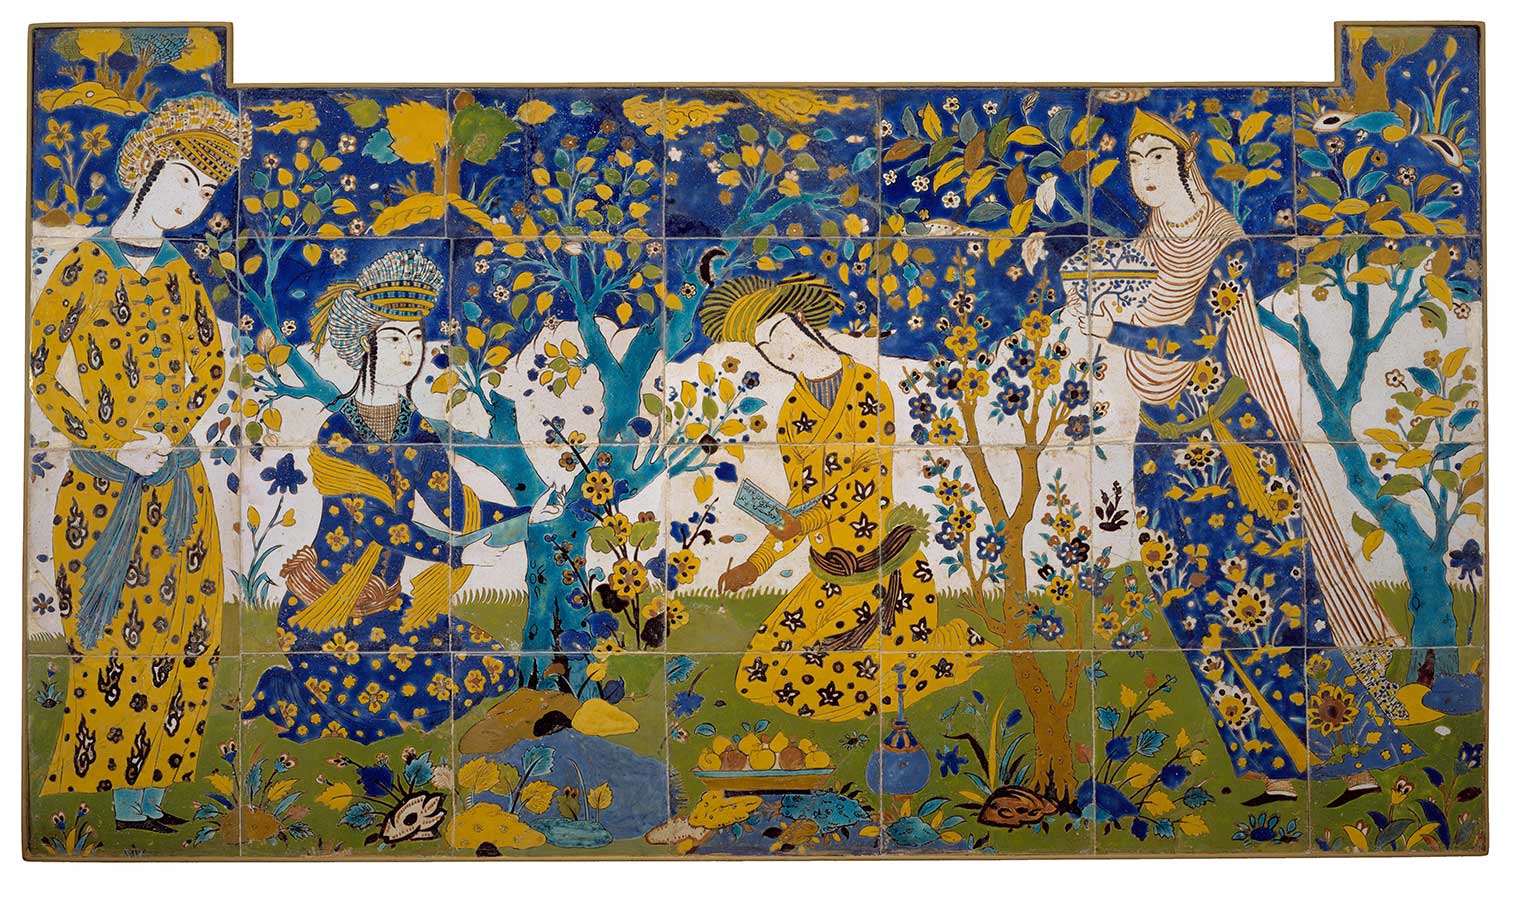
Reciting Poetry in a Garden, first quarter 17th century. From Iran, Isfahan. Stonepaste; polychrome glaze within black wax resist outlines (cuerda seca technique). Panel with tabs: H. 35 1/4 in. (89.5 cm) W. 61 3/8 in. (155.9 cm) D. 2 1/2 in. (6.4 cm). The Metropolitan Museum of Art, New York, Rogers Fund, 1903 (03.9b)
Imagine you’re relaxing in this garden scene, which once decorated the walls of a building in Iran over four hundred years ago. The garden is filled with dozens of plants and flowers. Look closely and see if you can count the number of tiles that make up this work of art. Which tile is your favorite?
The artist used a limited color palette, or a small group of colors, to bring this garden to life. Name and describe the colors you see. What do they remind you of?
Draw a detail of this lush scene.
1. Pick one tile and draw it on a square piece of paper.
2. Draw the outlines of the objects in the tile you chose.
3. Notice how shapes are cut off at the edges of the tile. Draw your lines all the way to the edge of your paper.
4. Color in the outlines using bright colors to celebrate spring!
5. On another square piece of paper, your adult can draw a tile that’s next to the one you chose. When you place your drawings together, do they match up at the edges of the paper?
Check out this @metteens post on Instagram for more tips on recreating a tile.
Materials
- Paper
- Pencil
- Crayons, markers, or other colorful drawing materials
Share what you make on social media using @metmuseum and #MetKidsCreate. Tell us about your tile drawing and what you noticed about the work of art!
Queen Mother Portrait Pendant
Celebrate a special woman in your family by making a pendant for a necklace for her.
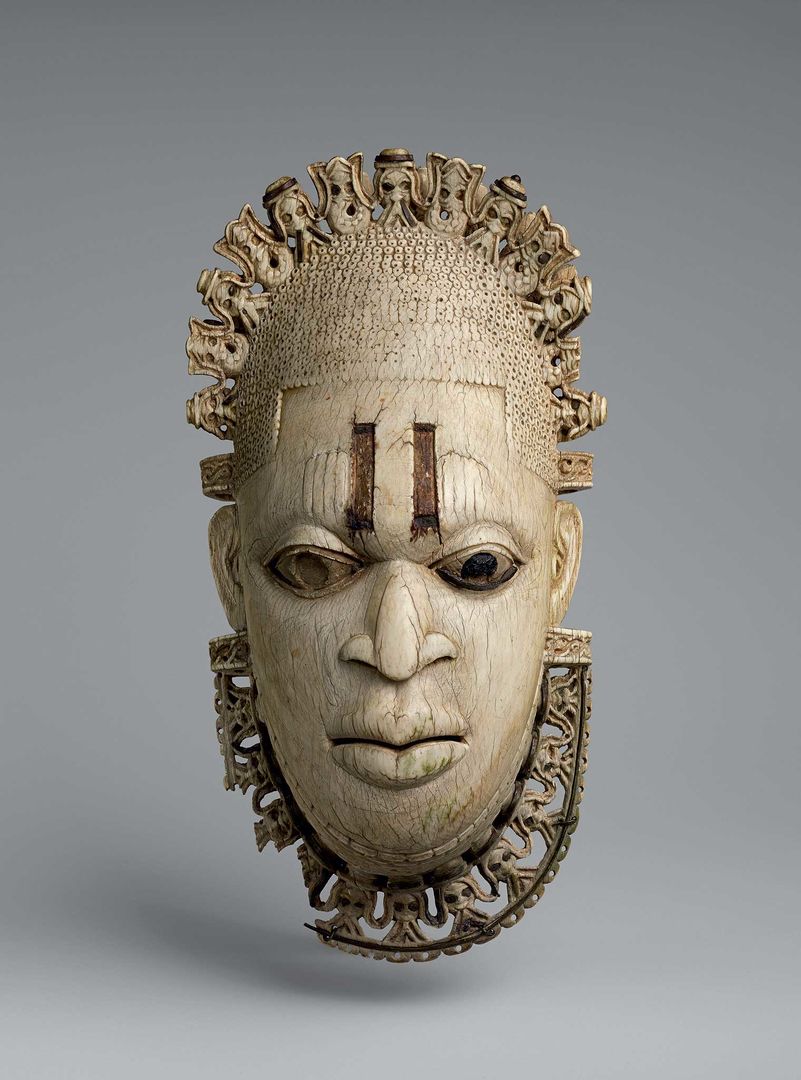
Queen Mother Pendant Mask: Iyoba, 16th century. Ivory, iron, copper. H. 9 3/8 x W. 5 x D. 3 1/4 in. (23.8 x 12.7 x 8.3 cm). The Metropolitan Museum of Art, New York, The Michael C. Rockefeller Memorial Collection, Gift of Nelson A. Rockefeller, 1972 (1978.412.323)
Oba (or King) Esigie ruled the kingdom of Benin in Nigeria over five hundred years ago. He wore this mask as a pendant around his neck during ceremonies to honor his mother, Queen Idia, and show her as a powerful leader and trusted adviser. Look closely. What qualities of the queen do you notice?
The materials of the mask tell us more about Queen Idia. Iron is used for the pupils, the rims of her eyes, and the marks on her forehead to show her inner strength. The rest of her face is made of white ivory, which symbolizes purity. What materials would you use to represent something important about your mother or a special woman in your life?
Create a pendant portrait of your mother or another important woman. What pictures, signs, or colors can you use to symbolize this person’s qualities?
1. Draw a portrait on cardstock or a recycled cardboard box.
2. Cut the portrait into a shape you can wear, leaving room around the face.
3. Add symbols around the edges to show others the powers or talents of this person.
4. Punch a hole at the top to turn the portrait into a pendant.
5. Run a string through the hole, then tie the end the string to make a necklace.
6. Gift the pendant to your mother or the important woman in your life, if you like.
Materials
- Cardstock or cardboard box
- Pencil, markers, crayons, or paint
- Hole punch
- String, yarn, or ribbon
- Scissors
- Decorative materials like glitter, fabric, gems, or buttons, if you like
Learn more about this pendant mask with #MetKids here and here!
Share what you make on social media using @metmuseum and #MetKidsCreate.
I Spy
Play a game of I Spy to test your artistic eye!
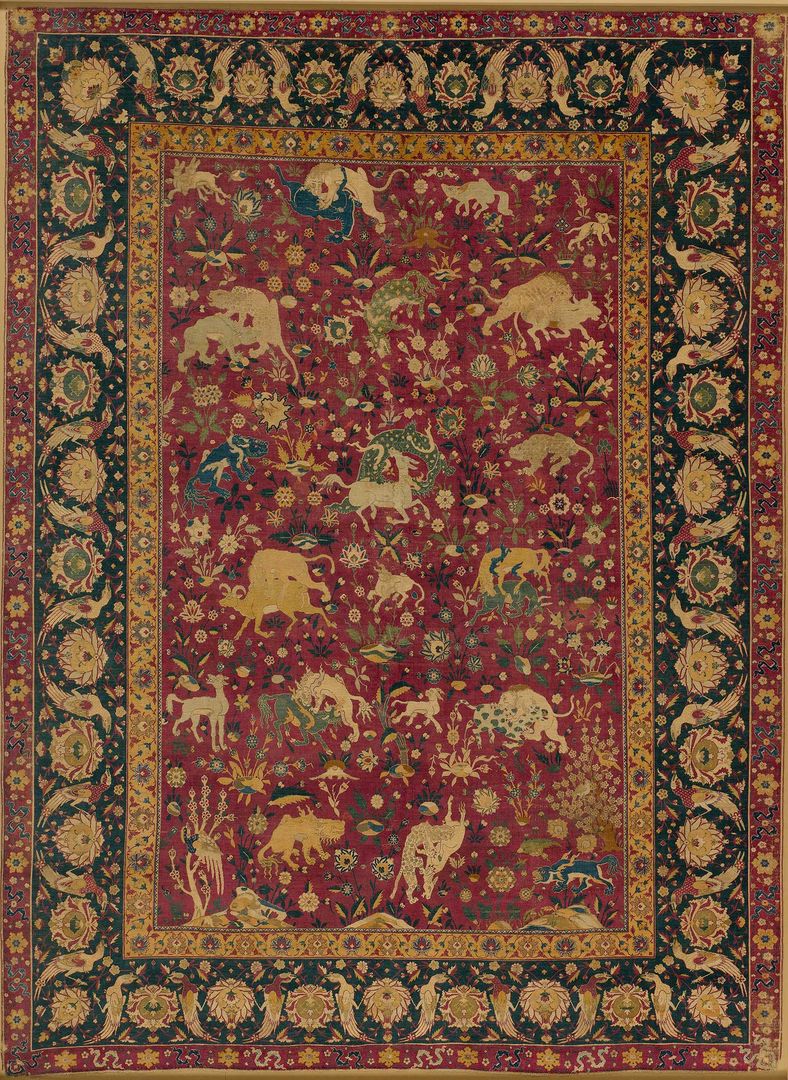
Silk Animal Carpet, second half 16th century. Made in Iran, probably Kashan. Silk (warp, weft, and pile); asymmetrically knotted pile. Rug: L. 94 7/8 in. (241 cm) W. 70 1/16 in. (178 cm). The Metropolitan Museum of Art, New York, Bequest of Benjamin Altman, 1913 (14.40.721)
Look closely at all the details of this small carpet made in Iran, and imagine what it would feel like to touch it with your hands. Look at the variety of animals and flowering plants. How many different animals and plants do you see? Where do you think someone would display this carpet in their home?
The carpet is woven out of silk with approximately eight hundred knots per square inch. If you looked at it under a microscope, you would see rows and rows of tiny knots. How do you think the artist planned to create each animal shape using tiny knots?
Learn more and create your own miniature loom on #MetKids!
Use the power of observation to spot details. Play a game of I Spy to discover every inch of this woven masterpiece! To play, one person spots an animal, flower, or design in the carpet and uses words to describe what they see. The other person looks at the carpet and guesses what the first person is seeing. For example, the first person says, “I spy with my little eye something green.” The second person might guess, “A plant!”
Materials
• Your keen eye and attention to detail!
• Pencil and paper to draw details, if you like
Share what you see in the carpet on social media using @metmuseum and #MetKidsCreate.
Moving Animals
Sculpt an animal in motion.
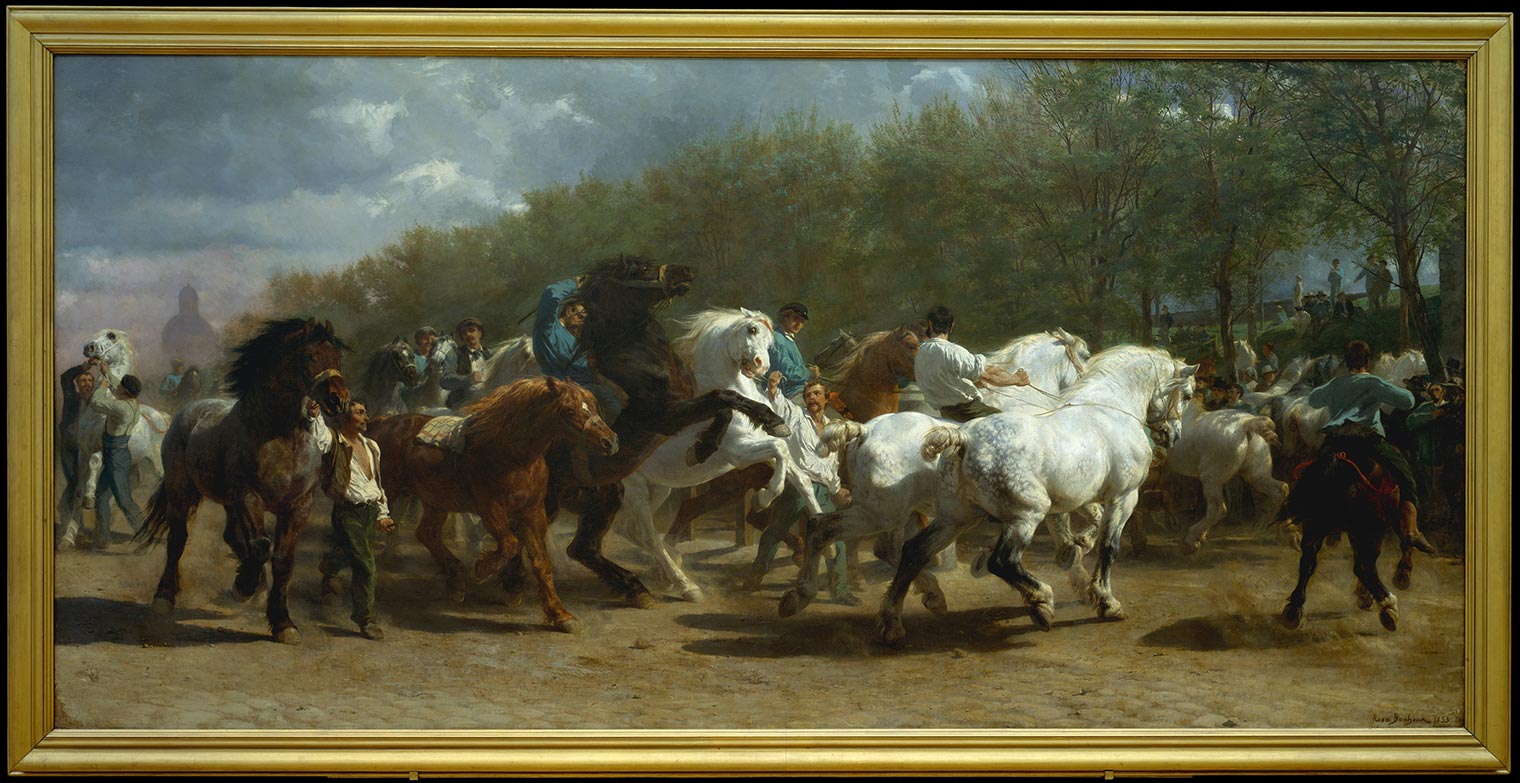
Rosa Bonheur (French, 1822–1899). The Horse Fair, 1852–55. Oil on canvas, 96 1/4 x 199 1/2 in. (244.5 x 506.7 cm). The Metropolitan Museum of Art, New York, Gift of Cornelius Vanderbilt, 1887 (87.25)
When the French artist Rosa Bonheur wanted to draw horses from life to prepare to paint her famous painting The Horse Fair, women were not allowed at the horse market in Paris. Instead, she went twice a week disguised as a man. She even had to apply for permission to wear men’s clothing in public!
This painting is full of action, excitement, and motion. Choose a horse that catches your attention and pose to recreate its motion.
Learn more about this painting with #MetKids!
If you have a pet at home or see an animal outside your window, take a few minutes to watch it move around. You can also watch a video of an animal in motion. How does the animal move its head? Can you tell when each foot touches the ground? Does the animal move quickly or slowly?
Rosa Bonheur was famous for her paintings and sculptures of animals and had a menagerie, or a collection of live animals, at her house where she could study them. Create a work of art showing your favorite animal in action.
1. Gather materials to make a sculpture at home, like clay to sculpt and a toothpick or fork to create details.
2. Start by sculpting the largest part of the animal. Think about the shapes you can use to make the body. Is it round like a ball? Or more like a long cylinder?
3. Create the head of the animal. Again, think about the shapes you can use to make it. Is your animal’s head looking up at the sky? Or down toward the ground?
4. Add legs and other details to the body. Here is where you can show your animal in motion! Depending on the animal, think about how the legs, wings, or tail bend at different angles.
5. Continue to add details that show motion. Think about whether the animal’s mouth is open or closed, the shape of the ears, and the movement of the fur, feathers, or scales!
Materials
- Self-hardening clay
- Plastic fork, toothpick, pencil, straw, or other items you have at home
Share what you make on social media using @metmuseum and #MetKidsCreate.
Storytelling and Songs
Create a song based on a family story that you can pass down through generations.
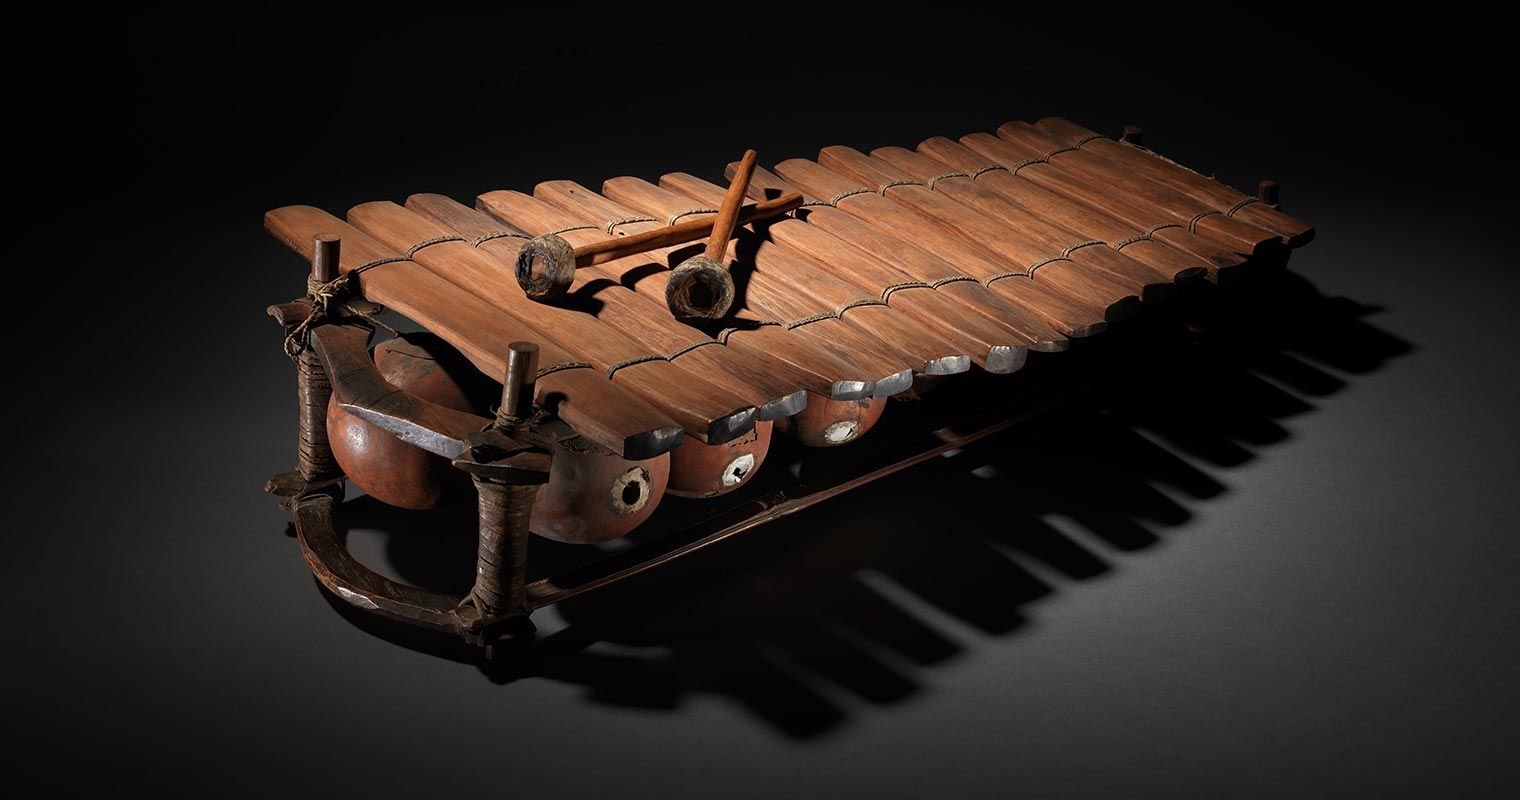
Bala (detail). Mandinka people. 19th century. Wood, gourd, hide, membrane, L. 34 1/16 x W. 17 15/16 × D. 8 11/16 in (86.5 x 45.5 × 22 cm). The Metropolitan Museum of Art, New York, The Crosby Brown Collection of Musical Instruments, 1889 (89.4.492)
Look closely at this large instrument, called a bala, and imagine how it sounds! A bala is a type of xylophone made from wood and gourds. How might this sound when you strike it with a mallet? What kinds of songs do you think people sing when someone plays this instrument?
In the region of West Africa known as the western Sahel, legendary tales are passed down through performances such as spoken word and song. Think about songs you and your family sing together. What are the songs about? When did you learn the songs? How often do you sing them?
Learn more about storytelling in West Africa with #MetKids!
Create a simple beat about a legendary story you like to tell! Tip: You can create a simple beat by clapping your hands or tapping a tabletop with your finger.
1. Think about how fast or slow you want your song to be.
2. Once you have a beat you like, add your story to the sounds.
3. Make it up as you go along, or write down ideas for words and phrases to go along with your beat.
4. Perform it for your friends or family!
Materials
- Your hands, fingers, or feet to create a beat
- Recording device, if you like
Share a video of your beat and song on social media using @metmuseum and #MetKidsCreate.
Materials Matter
Experiment with different materials to see how a work of art can express a feeling.

Barbara Hepworth (British, 1903–1975). Oval Form with Strings and Color, 1966. Elmwood, painted Elmwood, and cotton string, 33 7/16 x 22 7/16 x 21 5/8 in. (85 x 57 x 55 cm). The Metropolitan Museum of Art, New York, Purchase, Gift of Hon. and Mrs. Peter I. B. Lavan, by exchange, 2007 (2007.95). © Bowness, Hepworth Estate
Sculptor Barbara Hepworth carved this oval shape by hand from a giant elm tree. She also made sculptures of the same shape in bronze and green marble. She was interested in how using different materials changed the sculpture's look and feel.
Learn more about this sculpture with #MetKids!
Hepworth said, “If I have not been able to explore all possibilities of the shape, I'll do another one and see what happens.” How would the sculpture change if it was made out of stone or metal?
Hepworth often made similar versions of her artworks in different materials. Make a series of sculptures to explore how different materials can create a feeling.
1. Choose a shape to use in your own sculptures.
2. Collect different materials to sculpt, carve, or assemble your shape. Try your hand at sculpting with soap with #MetKids!
3. How many unique versions of your shape can you make? Notice how different materials or colors change your shape, how you sculpt, or how you feel about it.
4. Sketch or take a photo of your series of shape sculptures together.
Materials
- Material to sculpt with:
- Clay or dough
- Soap
- Found objects to add to your sculpture, such as:
- Bark
- Fabric scraps
- Paper or cardboard
- String
- Aluminum foil
- Wire
- Glue or tape
- Scissors
Share what you make on social media using @metmuseum and #MetKidsCreate.
Paint a Portrait
Make a portrait of an important woman in your life or your neighborhood to celebrate all the things they do!
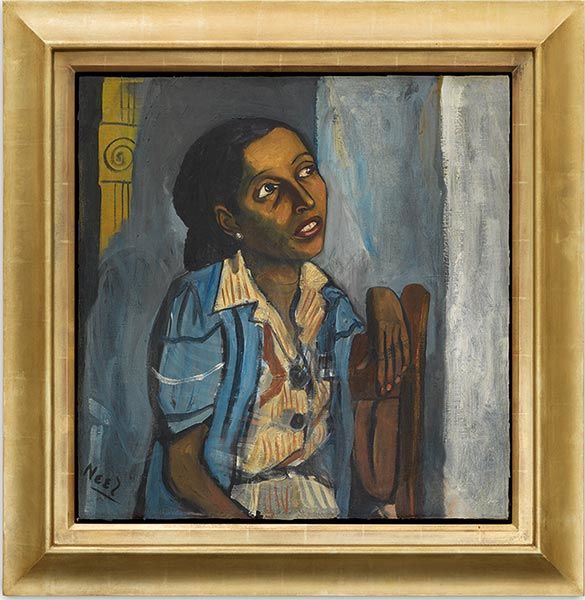
Alice Neel (American, 1900–1984). Mercedes Arroyo, 1952. Oil on canvas, 25 x 24 1/8 in. (63.5 x 61.3 cm). Collection of Daryl and Steven Roth © The Estate of Alice Neel
Alice Neel was an American artist who often painted families and people in her community. The woman in this painting, Mercedes Arroyo, was an activist who wanted to improve her East Harlem neighborhood, where Neel lived and painted for many years. She sits with her arm resting on the back of a chair and tilts her head to the right. She seems to be deep in thought. What might she be thinking?
Think about a woman in your family or community who wants to improve the world. Who is she? What does she do to make things better?
Draw a portrait of a woman who is important to you.
1. Collect materials to make your portrait, like a pencil, paper, paint, crayons, or, if you want, a photo of the person you’ll draw.
2. Draw the person you admire based on your memory or the photo. If you feel inspired by Alice Neel’s painting, draw your portrait so that the person is looking off to the side.
3. Use your paint, crayons, or other materials to color the background. Then add color to the person!
4. Think about these questions as you make your portrait: Is there a certain color the person wears a lot? Do they style their hair in a particular way? Do they wear accessories, like jewelry or a hat?
5. If you like, you can give your work of art to the subject of your portrait and tell them why you admire them.
Materials
- Pencil
- Paper
- Paint or crayons
- Photo of the person you want to draw, if you like
Share what you make on social media using @metmuseum and #MetKidsCreate. Tell us about the person in your portrait and why they are important to you or your community.
Learn more about another portrait of an important woman with #MetKids!
Heroines at Home
Create a work of art to honor a heroine in your life!

Jules Bastien-Lepage (French, Damvillers 1848–1884 Paris). Joan of Arc, 1879. Oil on canvas, 100 x 110 in. (254 x 279.4 cm). The Metropolitan Museum of Art, New York, Gift of Erwin Davis, 1889 (89.21.1)
Joan of Arc was a French heroine who fought in the Hundred Years’ war more than six hundred years ago. She was just a teenager when she led the French army in a series of victories over the English. Many artists have created works of art to honor her. In this painting, Joan of Arc stands in the middle of a garden with her head titled as though she is listening to something in the distance.
Joan of Arc is in her family’s overgrown garden in the French countryside. What do you notice about the background of the painting? What might it tell us about the story of Joan of Arc?
Learn more about Joan of Arc with #MetKids!
A heroine is a female hero, or a woman in stories or legends who is admired for her great courage. Who do you consider a heroine?
Celebrate Women’s History month by creating a collage to honor your heroine. A collage is a two-dimensional work of art made by gluing pieces of pictures, paper, and/or found materials. Add clues in the background to tell your heroine’s story and why you admire her.
1. Collect your collage materials. Look around your house for old magazines, catalogues, or printed pictures or photos.
2. Think about where your heroine is from, her history, and her accomplishments. Cut out pictures or shapes that represent your heroine to fill the background of your artwork.
3. Add your heroine by drawing or collaging a person into your work of art. Think about how your heroine is interacting with the rest of your picture.
4. Add details to the background and your heroine.
Materials
- Paper
- Old magazines, catalogues, or any other paper materials you can use to create a collage
- Glue or tape
- Drawing materials, like pencils, markers, or crayons
Share what you make on social media using @metmuseum and #MetKidsCreate. Tell us about your heroine and why you decided to create a work of art about her!